
Import Level‑2 Tick‑by‑Tick Data
After deploying DolphinDB, you can import historical data into the database before querying, computing, or analyzing it. To help you import data quickly, this tutorial walks you through the process step by step, using CSV files as an example.
1. Task Planning
Before importing historical data, upload the CSV files to the DolphinDB server. Then analyze the data source in light of DolphinDB's data types, choose a schema that satisfies the database and table-creation requirements, and a storage strategy based on whether you need to join tables. Finally, plan a suitable partitioning scheme.
1.1 Analyze Data Source
1.1.1 Store CSV Files
DolphinDB can accept formatted CSV files where each row contains the same number of fields and uses a single-character delimiter. Common formats include:
-
The first row contains column names.
-
The first row is treated as data because the file does not contain column names.
-
The first few rows are comments , followed by the column names and data.
-
The CSV file has no date or stock-code column, in which case the missing information is given by the file or folder name.
Decompress the CSV files, place them on the DolphinDB server, and ensure that you have the necessary permissions to access the directory.
Tick‑by‑tick data includes tick‑by‑tick orders and tick‑by‑tick trades. The data fields for the Shanghai Stock Exchange (SSE) and the Shenzhen Stock Exchange (SZSE) differ, and each type of tick-by-tick data can reach several gigabytes per day for each exchange. When importing data that spans more than one week, parallelize the workload by day: assign a single day's partition to each concurrent task. For example:
-
One CSV file per day
-
All CSV files for the same day reside in the same folder
-
The file name includes the date
1.1.2 Import CSV Files
Use a Linux command such as head to open the CSV file and
then determine the field names and data types for the columns you want to
import or add. Determine field names as follows:
-
If the CSV file has column names, use the
extractTextSchemafunction to extract the column names and types. -
If the CSV file has no column names, refer to Field Type Conversion below to determine field names and types.
Field Type Conversion
The following table shows the data types supported by DolphinDB:
| Category | Data Type Name | ID | Examples | Symbol | Size | Range |
|---|---|---|---|---|---|---|
| VOID | VOID | 0 | NULL | 1 | ||
| LOGICAL | BOOL | 1 | 1b, 0b, true, false | b | 1 | 0~1 |
| INTEGRAL | CHAR | 2 | 'a', 97c | c | 1 | -2 7 +1~2 7 -1 |
| SHORT | 3 | 122h | h | 2 | -2 15 +1~2 15 -1 | |
| INT | 4 | 21 | i | 4 | -2 31 +1~2 31 -1 | |
| LONG | 5 | 22l | l | 8 | -2 63 +1~2 63 -1 | |
| COMPRESSED | 26 | 1 | -2 7 +1~2 7 -1 | |||
| TEMPORAL | DATE | 6 | 2013.06.13 | d | 4 | |
| MONTH | 7 | 2012.06M | M | 4 | ||
| TIME | 8 | 13:30:10.008 | t | 4 | ||
| MINUTE | 9 | 13:30m | m | 4 | ||
| SECOND | 10 | 13:30:10 | s | 4 | ||
| DATETIME | 11 | 2012.06.13 13:30:10 or 2012.06.13T13:30:10 | D | 4 | [1901.12.13T20:45:53, 2038.01.19T03:14:07] | |
| TIMESTAMP | 12 | 2012.06.13 13:30:10.008 or 2012.06.13T13:30:10.008 | T | 8 | ||
| NANOTIME | 13 | 13:30:10.008007006 | n | 8 | ||
| NANOTIMESTAMP | 14 | 2012.06.13 13:30:10.008007006 or 2012.06.13T13:30:10.008007006 | N | 8 | [1677.09.21T00:12:43.145224193, 2262.04.11T23:47:16.854775807] | |
| DATEHOUR | 28 | 2012.06.13T13 | 4 | |||
| FLOATING | FLOAT | 15 | 2.1f | f | 4 | Sig. Fig. 06-09 |
| DOUBLE | 16 | 2.1 | F | 8 | Sig. Fig. 15-17 | |
| LITERAL | SYMBOL | 17 | S | 4 | ||
| STRING | 18 | "Hello" or 'Hello' or `Hello | W | ≤ 65,535 | ||
| BLOB | 32 | |||||
| BINARY | INT128 | 31 | e1671797c52e15f763380b45e841ec32 | 16 | -2 127 +1~2 127 -1 | |
| UUID | 19 | 5d212a78-cc48-e3b1-4235-b4d91473ee87 | 16 | |||
| IPADDR | 30 | 192.168.1.13 | 16 | |||
| POINT | 35 | (117.60972, 24.118418) | 16 | |||
| SYSTEM | FUNCTIONDEF | 20 | def f1(a,b) {return a+b;} | |||
| HANDLE | 21 | file handle, socket handle, and db handle | ||||
| CODE | 22 | <1+2> | ||||
| DATASOURCE | 23 | |||||
| RESOURCE | 24 | |||||
| DURATION | 36 | 1s, 3M, 5y, 200ms | 4 | |||
| INSTRUMENT | 42 |
|
||||
| MKTDATA | 43 |
|
||||
| MIXED | ANY | 25 | (1,2,3) | |||
| ANY DICTIONARY | 25 | {a:1,b:2} | ||||
| ANY[<BasicType>] | Basic type ID + 128 | array(ANY[INT], 0, 10) | ||||
| OTHER | COMPLEX | 34 | 2.3+4.0i | 16 | ||
| DECIMAL | DECIMAL32(S) | 37 | 3.1415926$DECIMAL32(3) | 4 | (-1*10^(9-S), 1*10^(9-S)) | |
| DECIMAL64(S) | 38 | 3.1415926$DECIMAL64(3), 3.141P | P | 8 | (-1*10^(18-S), 1*10^(18-S)) | |
| DECIMAL128(S) | 39 | 3.1415926$DECIMAL128(3) | 16 | (-1*10^(38-S), 1*10^(38-S)) | ||
| ARRAY | Data types + the square bracket "[]", i.e., INT[], DOUBLE[], DECIMAL32(3)[], etc. | IDs of data types + 64 | array(INT[], 0, 10).append!([1 2 3, 4 5, 6 7 8, 9 10]) |
Among these types, integer and floating-point types can be used directly based on precision. DolphinDB has two distinctive types:
-
String: In DolphinDB, you can store a string as a SYMBOL type. A SYMBOL value is stored internally as an integer in DolphinDB, making sorting, querying, and comparisons more efficient. Therefore, using the SYMBOL type can improve system performance and save space. The rule for using SYMBOL versus STRING is: use SYMBOL for repetitive strings with a limited set of values, and STRING for descriptive strings that rarely repeat. For example, use SYMBOL for stock codes and trade-type flags (such as "IBM", "C", "MS"), and STRING for comments, custom information, and similar descriptive texts. In structured level‑2 data, STRING is seldom used.
-
Temporal types: As shown in the table above, DolphinDB supports multiple temporal types. For any columns involving dates or times, we recommend choosing the temporal type that matches the required precision.
The following figure shows a CSV file viewed using the head
command.
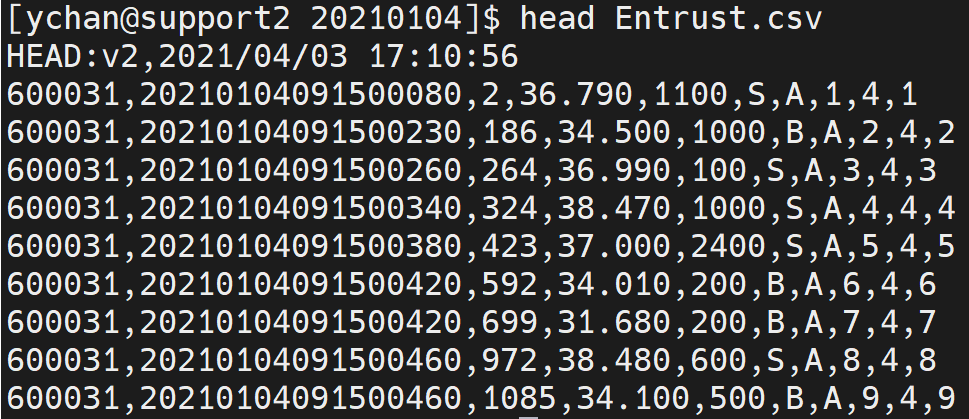
As you can see, the first row of this CSV file contains descriptive comments that need to be skipped when reading. This file has no column names; data starts from the second row and there are 10 columns in total. The field names from left to right can be defined as SecurityID, TransactTime, valOrderNoue, Price, Balance, OrderBSFlag, OrdType, OrderIndex, ChannelNo, BizIndex.
Here, SecurityID, OrderBSFlag, and OrdType are repetitive strings with a limited set of values, so use SYMBOL; TransactTime is a date‑time value with millisecond precision, so use TIMESTAMP; the remaining fields are straightforward: use INT for integers and use DOUBLE for floating‑point numbers. Therefore, the data types from left to right are: SYMBOL, TIMESTAMP, INT, DOUBLE, INT, SYMBOL, SYMBOL, INT, INT, INT.
For CSV files in other formats, determine field names and data types in the same way. The database will store data using these types.
The table schema defined above has the same number of columns as the CSV file. You can add or remove columns if needed. Note that the field names and data types correspond one‑to‑one in order. For example, if you plan to store data from the SSE and the SZSE together, analyze the CSV files from both exchanges separately, decide on the common columns to keep, and determine the field names and types.
Importing data into DolphinDB involves first reading the CSV file into memory and then writing it to disk. Different CSV files may store the same field differently. Therefore, the data types may not be correctly recognized when the CSV is loaded into memory. You may need to convert the following fields:
-
Stock-code column: Values like 002415 or 600001 in numeric form are recognized as INT and need to be converted to SYMBOL. If stock codes have different lengths, pad them to a fixed 6‑digit width during conversion.
-
Temporal columns: Numeric values such as 20220101093000000, 20220101, 93000000, or epoch values are recognized as LONG and need to be converted to the appropriate temporal type, such as TIMESTAMP, DATE, or TIME.
-
Trade flag columns: Letters such as C, B, or S are recognized as CHAR and need to be converted to SYMBOL.
-
To store a column as SYMBOL, you simply need to convert it to the STRING type.
In summary, conversion is necessary when some column types do not match what you expect. The conversion steps are straightforward and will be detailed in the later sections.
1.2 Design the Storage Scheme
After analyzing the data sources, you need to plan how to create databases and tables in DolphinDB for level-2 tick-by-tick data. The storage design principle is: if no table-join analysis is needed, store the data in a single table within one database; if table joins are required, use multiple tables within one database.
-
Tick-by-tick orders and tick-by-tick trades from the SSE and the SZSE usually require table-join analysis, so using multiple tables within one database is recommended.
-
When data from the SSE and the SZSE do not need to be combined, create two databases: one for the SSE and the other for the SZSE. In each database, create two data tables: one to store tick-by-tick orders and the other to store tick-by-tick trades.
-
If data from both the SSE and the SZSE needs to be stored together, create one database with two data tables: one table for tick-by-tick orders from both exchanges, and the other for tick-by-tick trades from both exchanges.
DolphinDB has no upper limit on the amount of data for each table. You can store all data of the same type in a single table without splitting it across multiple databases or tables.
1.3 Plan Partition
Planning partitions is the most critical step before creating a database. It provides the following benefits:
-
Partitions make large tables easier to manage and improve query performance.
-
Partitions allow the system to fully utilize resources, increasing computation performance.
-
Partitions increase system availability.
See Distributed Database Overview for partition principles and guidelines.
For level-2 tick-by-tick data, we recommend a composite partition: first apply a value partition on date, then a HASH partition on stock code.
The number of partitions depends on the data size. For the TSDB engine, each partition should contain 400 MB to 1 GB of uncompressed data; for the OLAP engine, each partition should contain 100 MB to 300 MB of uncompressed data.
Partitioning is performed at the database level, so all data tables within the same database share the same partitioning scheme. When two tables that need to be joined are stored in the same database, use the larger table as the reference and apply the partitioning principles described above.
2. Import the Data
After completing the analysis and planning, follow the steps in this chapter to import the data. Begin by testing with a single file. After successful testing, use parallel imports to load the full dataset quickly.
2.1 Create the Database and Table
This tutorial uses tick-by-tick order data from the SSE as an example to create
databases and tables. Click Entrust to download the sample data.
After decompressing the file, place it under the
loadForPoc/SH/Order/20210104 directory. In DolphinDB, you
can use the create statement to create databases and tables.
When creating a database in DolphinDB, you can choose from the following storage
engines: TSDB, OLAP, PKEY, OLTP, VectorDB, TextDB, etc.
This tutorial recommends using the TSDB engine. The daily tick-by-tick order data from the SSE is around 3 GB. Based on the previous partition planning, first apply a value partition on date, then use a HASH partition with 7 buckets on the stock code. When partitioning by date with VALUE, provide only two or three initial date values when setting up the partition. The partition values automatically extend based on the actual dates in the data.
The complete code is as follows:
if (existsDatabase("dfs://sh_entrust"))
{
 dropDatabase("dfs://sh_entrust")
}

create database "dfs://sh_entrust" partitioned by VALUE(2022.01.01..2022.01.03), HASH([SYMBOL, 10]), engine='TSDB'
After creating the database, you can create the table. The key to creating a
table is specifying the column names and types. First, use the
head command on Linux to inspect the structure of the CSV
file, as shown below:
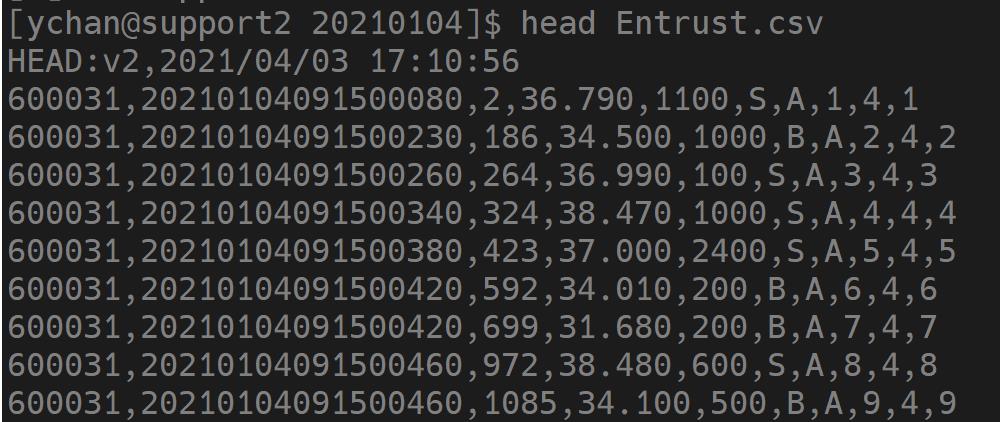
The first row is a file description, which must be skipped in all reads. Data starts from the second row, with no column names. When creating the table, you must define the column names and data types.
When creating a table, both the OLAP and TSDB engines require you to specify the
partitioning columns, for example: partitioned by
TransactTime,SecurityID. The TSDB engine also requires you to
specify a parameter for the sort columns within each partition, for example:
sortColumns=[`SecurityID,`TransactTime]. Note that the
column order cannot be changed.
The complete code is as follows:
create table "dfs://sh_entrust"."entrust"(
SecurityID SYMBOL,
TransactTime TIMESTAMP,
valOrderNoue INT,
Price DOUBLE,
Balance INT,
OrderBSFlag SYMBOL,
OrdType SYMBOL,
OrderIndex INT,
ChannelNo INT,
BizIndex INT)
partitioned by TransactTime,SecurityID,
sortColumns = [`SecurityID,`TransactTime]Decide on the number of columns based on your requirements. If the CSV file is missing certain columns or contains extra ones, you can add or delete columns.
When the number of columns differs from that in the CSV file, determine the number of HASH partitions as follows: sum the byte sizes of all column data types to get the size of one row, then multiply by the number of rows to get the data size for one day. Finally, divide the one-day data size by the size of each partition to determine the number of HASH partitions.
Typically, tick-by-tick data does not need deduplication. If deduplication is needed, you can specify the keepDuplicates parameter when creating the table. Optional values are:
-
ALL: keep all records;
-
LAST: only keep the last record;
-
FIRST: only keep the first record.
2.2 Write the Import Script
2.2.1 Import a Single File
The core function for importing data into DolphinDB is
loadTextEx, which integrates CSV file reading, data
cleaning, and loading in one step. The core code for importing data is as
follows:
db = database("dfs://sh_entrust")
def transType(mutable memTable)
{
 return memTable.replaceColumn!(`col0,string(memTable.col0)).replaceColumn!(`col1,datetimeParse(string(memTable.col1),"yyyyMMddHHmmssSSS")).replaceColumn!(`col5,string(memTable.col5)).replaceColumn!(`col6,string(memTable.col6))
}
filePath = "path to your data/Entrust.csv"
loadTextEx(dbHandle = db, tableName = `entrust, partitionColumns = `col1`col0, filename = filePath, skipRows = 1,transform = transType)
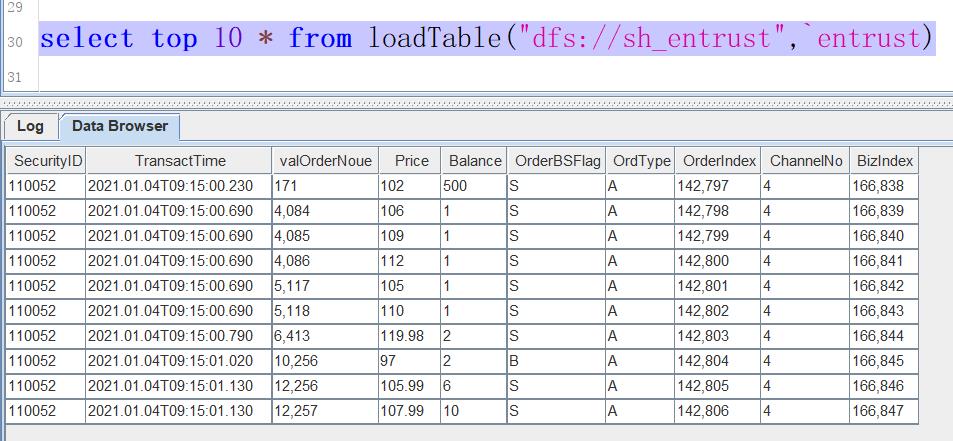
After the import, you can query a sample of the data with the following code:
select top 10 * from loadTable("dfs://sh_entrust",`entrust)If the import succeeded, the result will be like:
Possible issues during single-file import and the solutions:
-
Data type mismatch: a common error message is “A column requires type SYMBOL, but the actual data type is INT”. This indicates that you need to convert the data type. See 2.2.2 Clean and Transform Data for details.
-
If NFS storage media is used, you may encounter a "Bad file descriptor" error. In this case, you need to remount the NFS file. The NFS share must use version 3, and the local_lock parameter must be set to all. The specific mount command is:
mount -t nfs -o v3,local_lock=all [IP]:/hdd/hdd0/nfs /hdd/hdd0/DolphinDB-test/ -
The execution has no errors while the task runs for a long time without finishing. The wait time far exceeds the expected time. Checking the disk status reveals no write activity. This occurs because a single CSV file is too large and the cache is insufficient. The cache is a dedicated memory area for data ingestion. For more details on the cache mechanism, see Redo Log and Cache Engine and TSDB Storage Engine. The solution is to first set the values of the OLAPCacheEngineSize and TSDBCacheEngineSize parameters larger than the CSV file size, and then restart the system.
The download link for the complete single-file import script is: loadOneFile.dos.
2.2.2 Clean and Transform Data
In the import code from the previous section, the loadTextEx function is used. Its transform parameter references the transType function, which performs data cleaning and type conversion. The import mechanism of loadTextEx is as follows:
First, the CSV file is loaded into memory as an in-memory table. The data types of this in-memory table may not match the types defined in the previously created table. You can attempt automatic conversion by specifying schema. For details, see Handling Column Names and Data Types. Types that cannot be automatically converted will throw an error. At this point, you need to use the function referenced by transform to perform data type conversion and data cleaning. The cleaned and transformed data is obtained from the function's return value, which is still an in-memory table. Then, write the processed data to the corresponding table in the database on disk. If the transform parameter is specified, the structure of the DFS table is consistent with the table returned by the function referenced by transform, and does not need to match the structure of the original CSV file.
transform can fulfill the following requirements:
-
Data type conversion
-
Adding columns based on the CSV file
-
Filtering out invalid data in the CSV file
-
Character encoding conversion, typically from GBK to UTF-8
-
Combining multi-level data into an array vector
2.2.3 Convert Data Types
DolphinDB provides the extractTextSchema function for
reading the schema of a CSV file. Use the following code to extract the
schema of a CSV file:
filePath = "/path to your data/Entrust.csv"
extractTextSchema(filename = filePath, skipRows = 1)
After execution, the result is shown in the following figure.
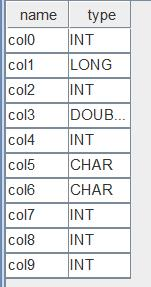
The first column, name, contains the column names in the CSV file. If the CSV file has no column names, the columns are automatically named col0, col1, etc. If there are column names in the CSV file, the column names match those names. The second column, type, represents the data types automatically recognized for each column in the CSV file. The fields in this result table correspond one-to-one, from top to bottom, with the fields defined during table creation. We have lined them up as shown in the following figure:
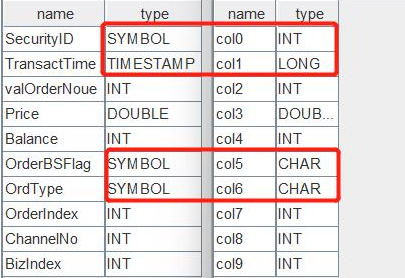
By comparison, we can see that the fields col0, col1, col5, and col6 in the in-memory table have different types from the corresponding fields SecurityID, TransactTime, OrderBSFlag, and OrdType in the data table. If you perform the data import directly at this point, as shown in the following code:
db = database("dfs://sh_entrust")
filePath = "/path to your data/Entrust.csv"
loadTextEx(dbHandle = db, tableName = `entrust, partitionColumns = `col1`col0, filename = filePath, skipRows = 1)
The system throws an error: “The column[SecurityID]expects type of
SYMBOL,but the actual type is INT”. It means that the SecurityID
values are integers, which does not satisfy the SYMBOL type requirement. The
transType function defines custom data type
conversions. After assigning it to transform and running the import
again, it will complete without errors. Data import and type conversion for
other fields follow the same approach. In this case, four columns are
converted. The code is as follows:
def transType(mutable memTable)
{
 return memTable.replaceColumn!(`col0,string(memTable.col0)).replaceColumn!(`col1,datetimeParse(string(memTable.col1),"yyyyMMddHHmmssSSS")).replaceColumn!(`col5,string(memTable.col5)).replaceColumn!(`col6,string(memTable.col6))
}
As you can see, a replaceColumn! function is added for each
column modification. This function replaces a specified column in the table
with a vector. After the replacement, the data type of the specified column
matches the data type of the vector. In this case, the first parameter is
the column name in the data table, and the second parameter is the processed
data. Therefore, the key to data type conversion is the second parameter of
the replaceColumn! function. In practice, when importing
financial data, the main cases are as follows:
-
Time and date in epoch format, which is the difference between the specified time and 1970-01-01 00:00:00. This difference can be in seconds, milliseconds, etc. It is a string of digits and will be automatically recognized as an integer. During conversion, pass this integer to the corresponding DolphinDB temporal functions. For second precision, use
datetime; for millisecond precision, usetimestamp; for nanotimestamp precision, usenanotimestamp. Tick-by-tick data is usually precise to milliseconds. The type conversion function is written as:def transType(mutable memTable) { return memTable.replaceColumn!(`epochTimeCol,timestamp(memTable.epochTimeCol)) } -
The time is in a date format consisting of pure digits for year, month, day, hour, minute, second, etc., with no separators. For example, 20220101, 20220101093000, etc. These will be recognized as integers. During conversion, first convert these numbers to strings using the
stringfunction, and then format them into the corresponding date format usingtemporalParse. Tick-by-tick data is usually precise to milliseconds. This type conversion function is written as:def transType(mutable memTable) { return memTable.replaceColumn!(`ymdTimeCol,datetimeParse(string(memTable.ymdTimeCol),"yyyyMMddHHmmssSSS")) } -
Stock codes are pure digits and will be recognized as integers. Stock codes are recommended to be defined as SYMBOL type. In the in-memory table, use the
stringfunction to convert them to string format, and they will be automatically stored as SYMBOL type during import. Additionally, stock codes are usually 6 digits. If they start with 0, you need to pad them using thelpadfunction. The function for converting a stock code column is written as:def transType(mutable memTable) { return memTable.replaceColumn!(`securityId,lpad(string(memTable.securityId),6,`0)) }
2.2.4 Add a Column Based on Filename
Sometimes, CSV files lack certain columns, such as a date column, but the date information is provided through the filename. The date for all data in the file is the same as the filename. In this case, we use the function referenced by the transform parameter to add the column and assign values. The code is as follows:
def addCol(mutable memTable,datePara)
{
    update memTable set date = datePara
    return memTable
}
The newly added column is always at the end. If the order does not match that of the DFS table, use the reorderColumns! function to adjust the order before the function returns.
2.2.5 Filter Data
In some cases, you need to filter out invalid data from the CSV file before writing to the DFS table. Use a select statement in the function referenced by transform to keep only the rows that meet your criteria. For example, to write only rows with a price greater than 0, the function definition is:
def fliterData(mutable memTable)
{
    return select * from memTable where price > 0
}
2.2.6 Convert Character Encoding
To ensure proper display, you sometimes need to convert GBK-encoded columns to UTF-8. The code for the function referenced by transform is:
def addCol(mutable memTable)
{
    return mutable.replaceColumn!(`custname,toUTF8(mutable.custname,`gbk))
}
2.2.7 Import Specific Columns
There are two ways to import specific columns. The first is to select only the required columns in the function referenced by transform, as shown below:
def partCol(mutable memTable)
{
    return select [required column names] from memTable
}
The second method is to specify schema. For details, see Importing Text Files.
2.2.8 Parallel Import
Parallel import enables fast data ingestion, but it can consume significant memory. Therefore, you need to configure an appropriate degree of parallelism before importing. workerNum controls the degree of parallelism. To estimate a reasonable value, divide the available memory by the size of one day's files. The available memory value is determined by maxMemSize, typically set to 80% of the machine's available memory. Also, ensure that maxMemSize does not exceed the memory limit specified in the license file.
During parallel import, multiple tasks cannot write to the same partition at the same time. When assigning tasks, make sure different tasks write to different partitions. Since the primary partition is by day, data from different dates are written to different partitions. Therefore, it is recommended to run parallel imports by mapping each day's data to a single task.
The example in this tutorial imports tick-by-tick order data for 9 business days from January 5 to January 15, 2021 in batch. For download, each day's data is limited to around 180 MB. Click to download Batch Import Data. Since the CSV files from the previous single-file import are large, it's recommended to delete those files before batch import. The basic steps for batch import are as follows:
-
Based on single-file import, wrap the import of one day's data in a function.
-
Submit a batch of tasks as asynchronous jobs to perform batch import day by day.
-
If data from two exchanges is required to store into a single table, you need to import them separately. Importing data from different exchanges in parallel at the same time means different tasks writing to the same partition simultaneously, which will raise an error.
See Job Management for asynchronous jobs in detail. The code is as follows:
def loadOneDayFile(db,table,filePath)
{
 csvFiles = exec filename from files(filePath) where filename like"%.csv"
 for(csvIdx in csvFiles)
 {
 loadTextEx(dbHandle = db, tableName = table, partitionColumns = `col1`col0, filename = filePath + "/" + csvIdx, transform = transType, skipRows = 1)
 }
}

def parallelLoad(allFileContents)
{
 db = database("dfs://sh_entrust")
 table = `entrust
 dateFiles = exec filename from files(allFileContents) where isDir = true
 for(dateIdx in dateFiles)
 {
 submitJob("parallelLoad" + dateIdx,"parallelLoad",loadOneDayFile{db,table,},allFileContents + "/" + dateIdx)
 }
}

allFileContents = "/path to your data"
parallelLoad(allFileContents)
The code defines the following two functions:
-
loadOneDayFile: imports one day's data of a certain type. Because one day's data may consist of multiple CSV files, the function needs to traverse all CSV files in the directory and import them one by one. This function takes three parameters:-
db: database handle.
-
table: table name.
-
filePath: directory parameter, up to the date level.
-
-
parallelLoad: takes a single parameter allFileContents, whose value is a directory path. The minimum level should be snapshots, tick-by-tick orders, tick-by-tick trades, etc. TheparallelLoadfunction traverses all dates under the specified directory as task parameters, then callsloadOneDayFileto submit tasks per date.
The implementations of loadOneDayFile and
parallelLoad are not fixed; you can adapt them flexibly
based on the data storage format. The primary goal is to submit tasks by
date, with each task importing one day's data of a specific type. After
executing, the function returns immediately. The submitted asynchronous jobs
run in the background. You can call the getRecentJobs
function to check the execution status. Job status is shown in the following
figure:
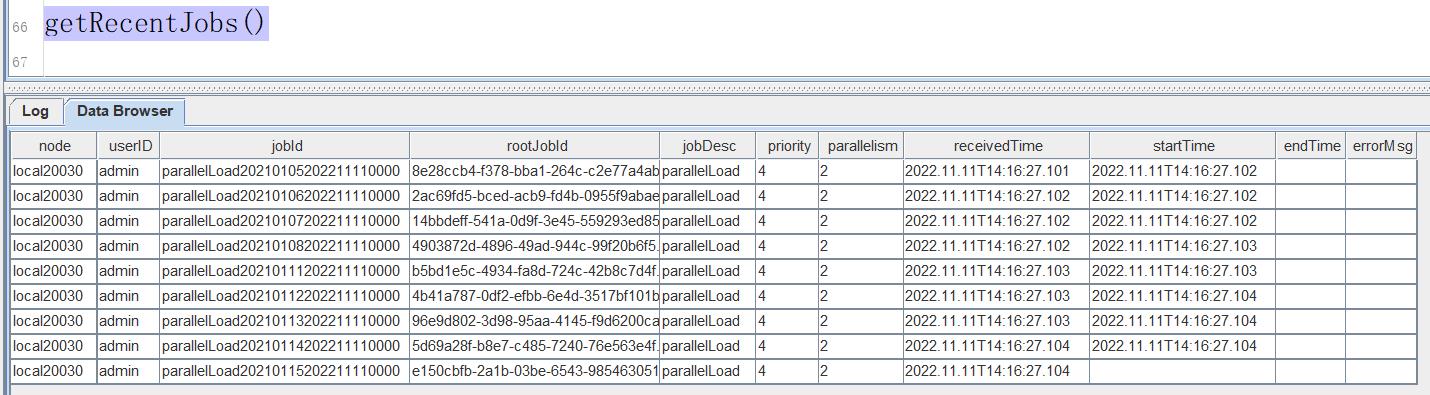
In the figure above, if startTime is not empty, the job is currently executing; if endTime is not empty, the job has completed; if errorMsg is not empty, the job encountered an error. Use the error message to debug your code.
Possible error messages in errorMsg and their solutions are as follows:
-
Error message similar to “Retrieve directory content[/path to your data/Order20210108]:No such file or directory”. The file cannot be found during import. This is often caused by incorrect path, such as an extra or missing forward slash “/”. Check the path carefully.
-
Error message: Out of memory. The cause is insufficient memory. You need to increase available memory or reduce the degree of parallelism.
-
Error message similar to “<ChunkInTransaction>filepath'/tickHot/20221125/Key0/5ncmg'has been owned by transaction 9702796 RefId:S00002”. This indicates a partition conflict: different tasks are writing to the same partition. Check whether data from different dates are mixed up or whether task partitioning is reasonable.
2.2.9 Monitor Import Status
During data import, if you care about import performance, you can use tools
to observe system resource utilization and identify any resource
bottlenecks. On a Linux system, enter the dstat command in
the terminal to monitor disk write activity as shown below:
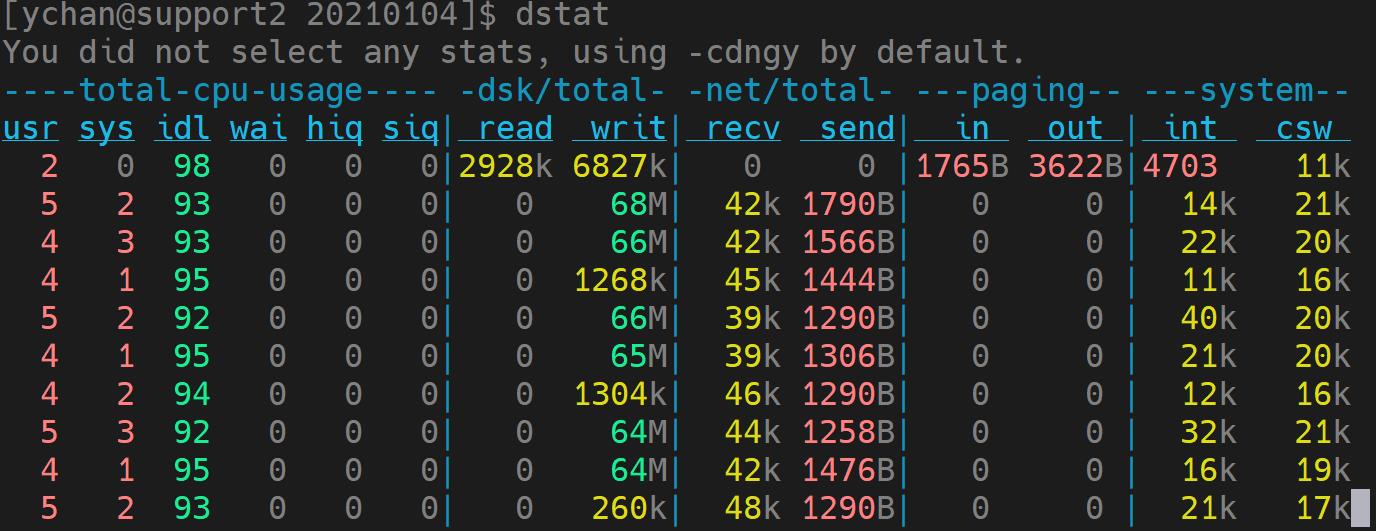
Parallel import aims for high write performance. By configuring multiple
disks, you can leverage the capability of parallel disk I/O. Configure disks
via the volumes parameter in the standalone configuration file
dolphindb.cfg or the cluster configuration file
cluster.cfg.
During parallel import, monitor resource usage by observing disk write speed, memory consumption, CPU utilization, and inter-node network throughput. If memory, CPU, and inter-node network are not fully utilized and disk I/O is not saturated, you can increase the workerNum configuration to raise the degree of parallelism.
In summary, by scheduling parallel tasks properly, you can make full use of your hardware to achieve the maximum possible import speed.
3. Q&A
-
I submitted only one file for import, but it runs for a long time without finishing and the disk shows no write activity. What could be the reason?
Answer: This happens because the single CSV file is too large and the cache is insufficient. This cache is a dedicated memory area for data ingestion. For details, see Redo Log and Cache Engine and TSDB Storage Engine.
The solution: first set both OLAPCacheEngineSize and TSDBCacheEngineSize to values larger than the CSV file size, then restart the system.
-
When importing, if time data is a pure numeric type in the format YYYYMMDDHHmmss, how can I convert it to DolphinDB temporal types?
Answer: Refer to the temporal type conversion section in 2.2.3 Convert Data Types.
-
During import, how do I convert epoch time values (offsets from 1970-01-01 00:00:00) to DolphinDB temporal types?
Answer: Refer to the temporal type conversion section in 2.2.3 Convert Data Types.
-
When importing, the stock-code column contains only numbers. How do I convert it to SYMBOL type?
Answer: Refer to the stock-code type conversion section in 2.2.3 Convert Data Types.
-
How do I handle an "out of memory" error during execution?
Answer: This error occurs because memory is insufficient during the import process. If you are using a Community Edition license, contact your sales or support representative to obtain a trial license. Then, check whether the maxMemSize parameter is set significantly lower than the system memory. It is recommended to set it to 80% of the system memory. Finally, check the workerNum configuration. A reasonable value is calculated by dividing available memory by the size of a single file and taking the floor: workerNum = floor(available memory / single file size).
-
When importing in an NFS system, a "Bad file descriptor" error occurs. How can I resolve it?
Answer: If your storage system contains NFS files, mount them using NFS version 3 with the local_lock parameter set to all. The specific command is:
mount -t nfs -o v3,local_lock=all [IP]:/hdd/hdd0/nfs /hdd/hdd0/DolphinDB-test/If the current mount does not use this configuration, unmount first and then remount using this method.
-
How can I filter out invalid data when importing with
LoadTextEx?Answer: Perform the filtering in the function referenced by transform. For details, see 2.2.5. Filter Data.
-
How can I add two extra columns when importing CSV data into a DolphinDB database?
Answer: Add them in the function referenced by transform. For details, see 2.2.4 Add a Column Based on Filename.
-
How can I import a subset of columns?
Answer: For details, see 2.2.7 Import Specific Columns.
-
How can I perform deduplication?
Answer: You can specify the keepDuplicates parameter when creating the table. The following options are available:
-
ALL: keep all records;
-
LAST: only keep the last record;
-
FIRST: only keep the first record.
-