Strategy & Backtest
To accurately test and validate the performance of strategies in real trading, Starfish supports backtest feature. Users can customize strategy functions, create and configure strategies, run backtests, and obtain backtest results.
My Strategies
The My Strategies page manages all private strategies and backtest presets of the current user.
Strategy Backtest
This page displays all private strategies of the user, including the strategy name, strategy type, data type, message type, tags, run records, creation time, updated time, creator, comment, etc. Users can create, edit, publish, export or delete strategies here.

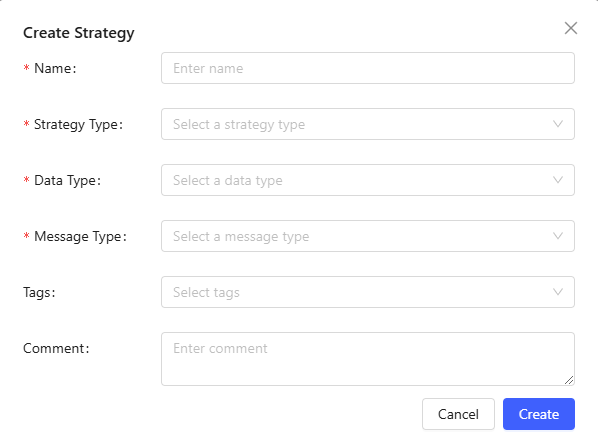
Create: Create a new strategy here. You need to specify the strategy name, strategy type (stocks, futures, options), data type (snapshot, minute frequency, daily frequency), and message type (TABLE, DICT). Tags and comment can also be set for easier differentiation and explanation of the strategy. Click Create to enter the strategy editing page.
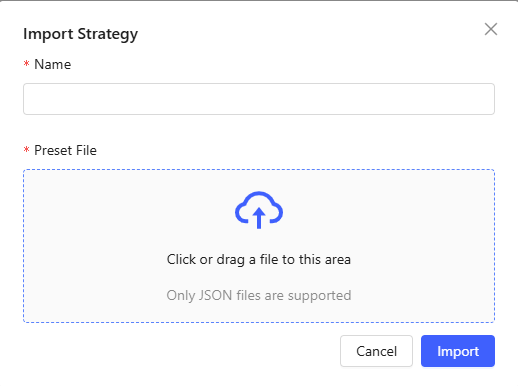
Import: Import a strategy file saved in JSON format from local system and name the strategy.
Edit: Click a strategy name or click OK after the new strategy creation to enter the editing page. You can define the event function, including initialize, beforeTrading, onTick, onBar, onSnapshot, onOrder, onTrade, afterTrading, finalize. More details about each function can be viewed by toggling the Help Docon the right.

- Code History: The last five saved versions of the code are recorded, and any two of them can be compared.
- Edit Description: Edit the strategy name, strategy types, data type, tags, and comment.
- Run: Run a backtest based on the current strategy. Enter the running page.
- Save: Save the code.
Run: Click Run to select either historical backtest or real-time backtest. Currently, this window won’t pop up for cryptocurrency.
- For historical backtest, you need to set configuration, data source, custom parameters, visualization templates, attribution and parameter combination.
- For real-time backtest, users need to set parameters and set data source.
You can quickly set the above parameters using presets. For more details on parameter settings, please refer to the Backtest Presets section.
Export: Export the strategy as a JSON format file to the local system.
Publish: Publish the strategy to the department, allowing other users in the department to use it.
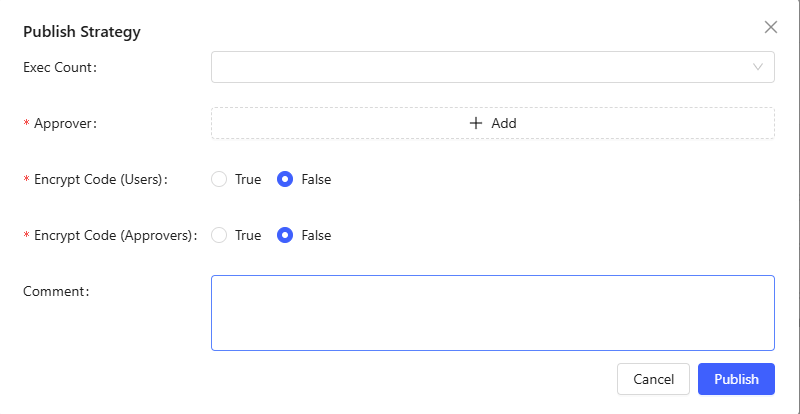
- Exec History: Select the run records for approval reference.
- Approver: Select the department and approver for publishing. If the strategy has been published before, and this is a republish after modification, the department from the initial publish is mandatory.
- Encrypt Code (Users): Other users can only run the published strategy but cannot view its source code.
- Encrypt Code (Approvers): Approvers cannot view the source code during the approval process.
- comment: Add comments about this strategy for other users' reference.
Delete: Delete the current strategy.
Batch Delete: Select multiple strategies for batch deletion.
Backtest Presets
For the same strategy type and data type, users often need to fill in the same or similar parameters. The backtest presets help users quickly fill in parameters. Additionally, users can configure multiple sets of parameters to optimize parameters.
This page displays all presets of the current user, including name, backtest type, tags, data type, strategy type, comment, creator, creation time, update time, etc.

Create: Create a new preset. You need to specify the strategy type, data type, and backtest type for the preset, which determines the parameters to be filled in.
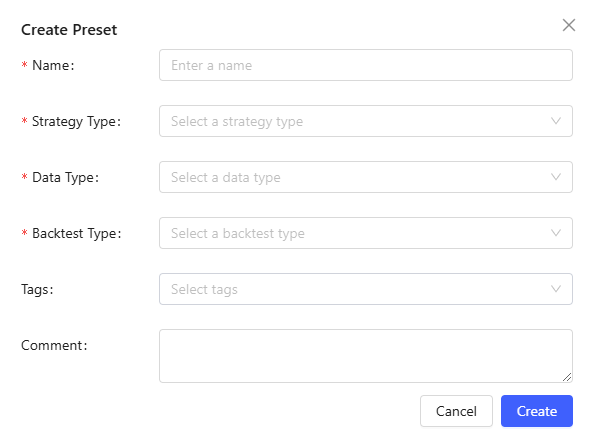
Click Create to enter the preset editing page.
Import: Import a preset file saved in JSON format from local system and name the preset.
Edit: Edit presets.
- Configuration: Basic parameters are determined by the strategy type, including backtest time, initial cash, commission, etc. Historical backtest allows adding multiple sets of parameters, while real-time backtest only supports one set of parameters.
- Data Source: Basic data source is determined by the strategy type and market
data source is determined by data type and benchmark data source. Here, you
can set the table information and market data required for backtest. You can
set data source by specifying a table or writing custom code. The structure
of the basic data source, market data source and benchmark data source has
clear requirements, i.e., column names and corresponding data structures are
fixed. Therefore, when using an existing table, you need to ensure the
mapping relationship between the existing table and the target table; when
writing custom code, the result table's column names and data structure must
meet the requirements. Specific requirements can be found in the target
column names and types on the From Table tab. Additionally, the
calculation result must be assigned to the variable `result`.Note:In each tab of the editingpage, click Save to save the configuration on the current tab.
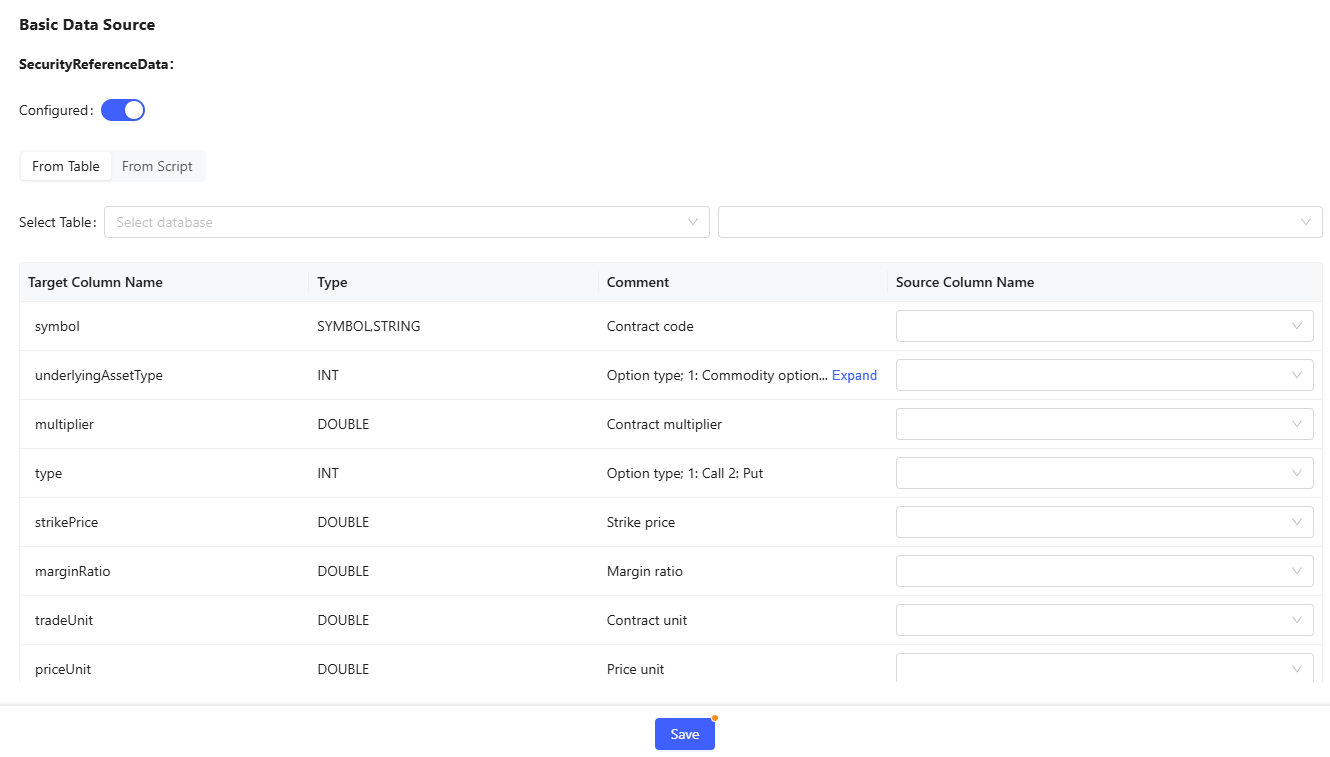
Figure 8. Basic Data Source 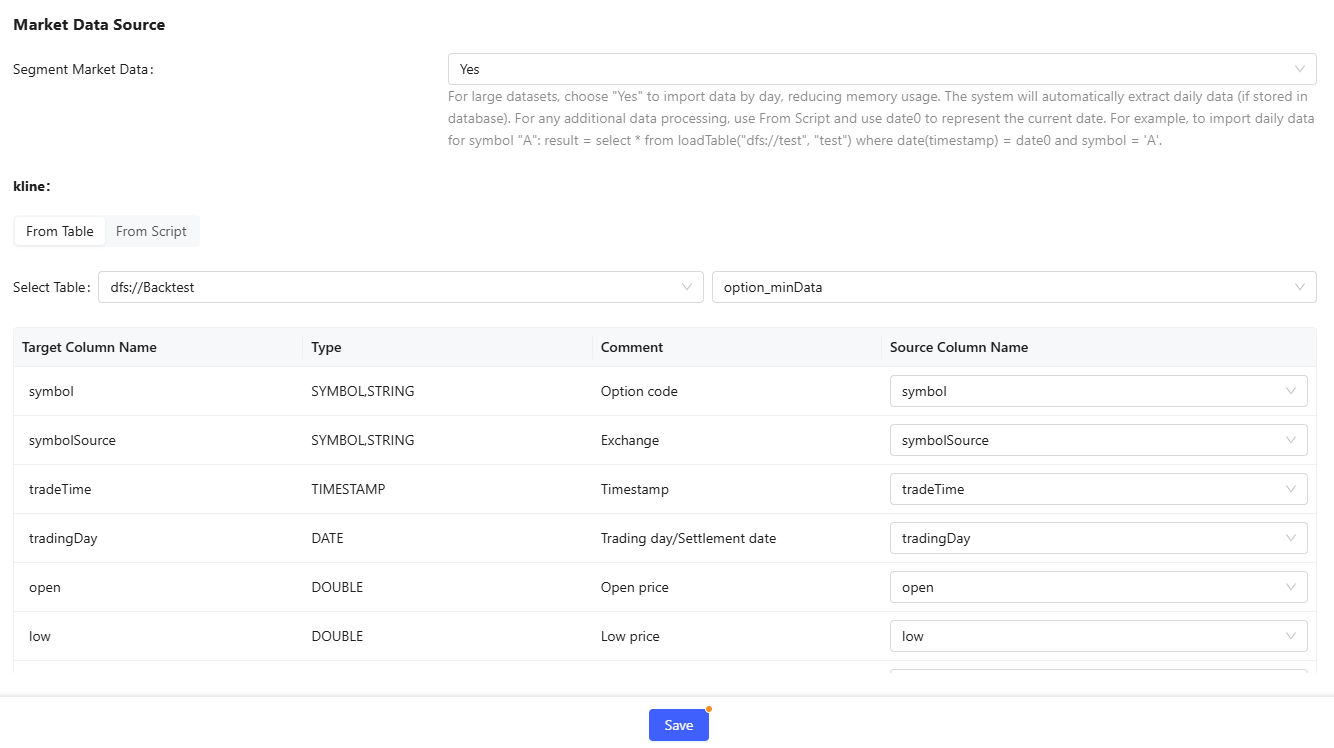
Figure 9. Market Data Source 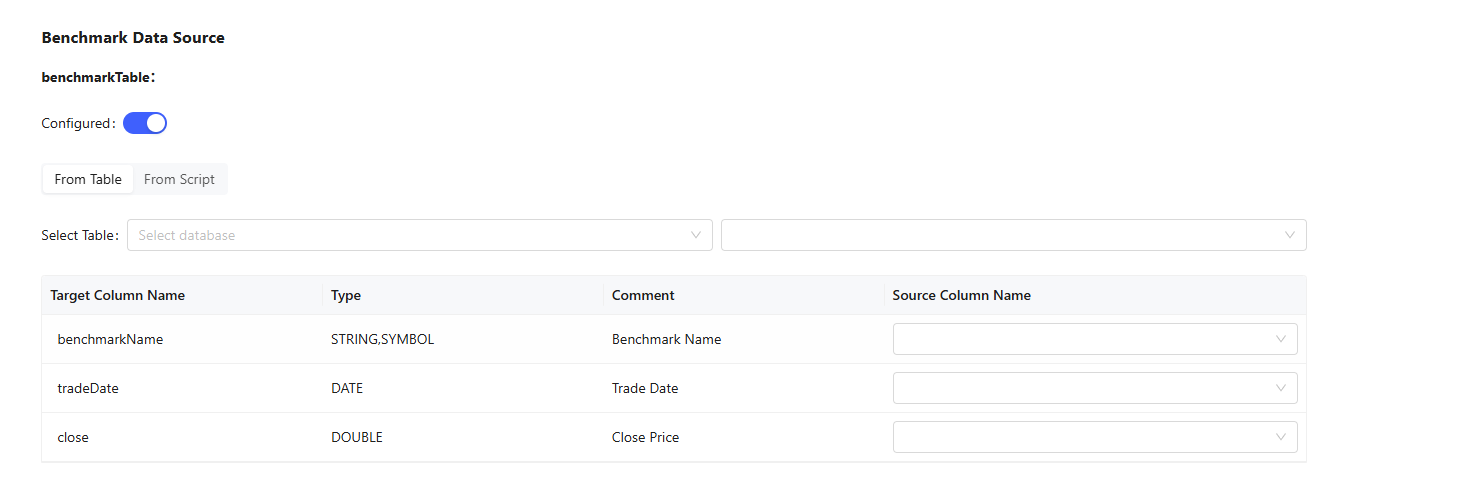
Figure 10. Benchmark Data Source - For the benchmark data source:
- For historical backtest, choose between existing database tables or custom calculations.
- For real-time backtest, specify a stream table.
- For the benchmark data source:
-
Custom Parameters: Define any custom parameters used in event functions. For example, you can define the parameter shortWindowNused in the
initializefunction and assign multiple values (separated by “,”) to this parameter to optimize it.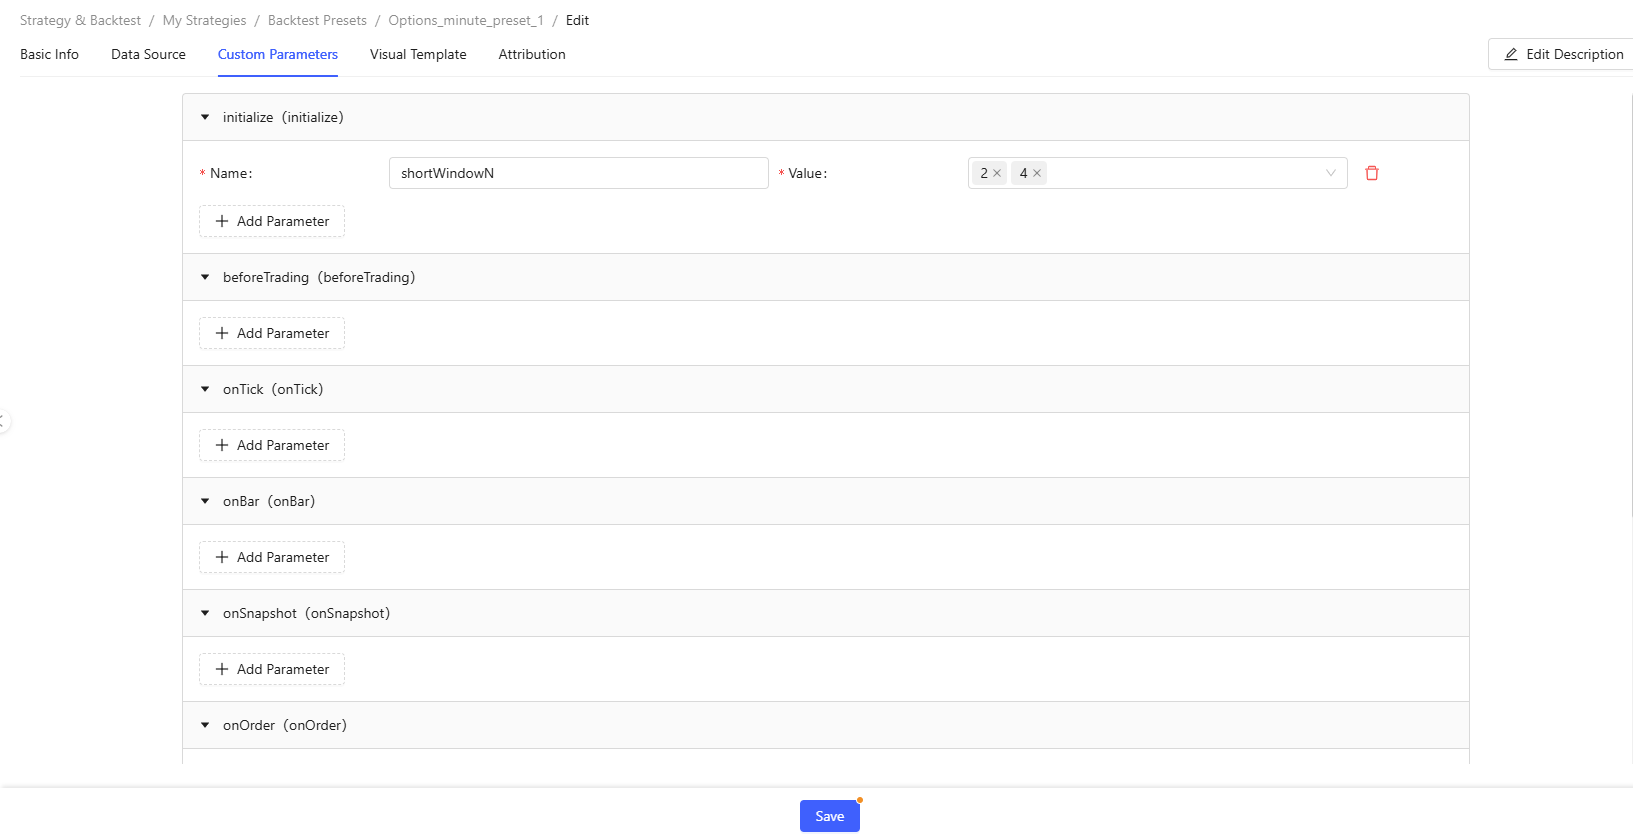
Figure 11. Custom Parameters - Visualization Template: Select a visualization template. If none is
selected, the default template will be used for rendering.
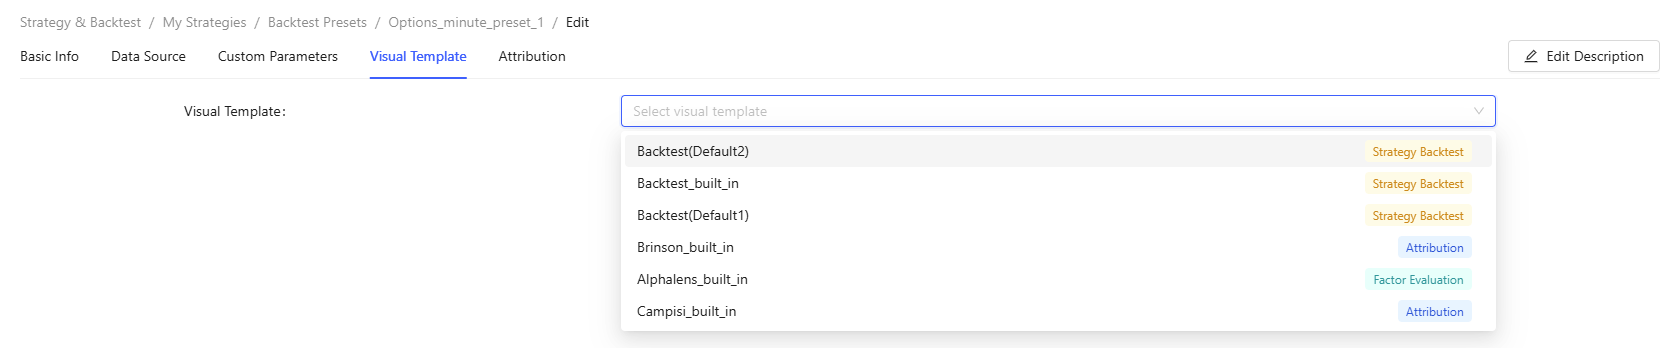
Figure 12. Visualization Template - Attribution: Specify whether to perform performance attribution for the backtest. If yes, you can select an existing attribution template, fill in the corresponding parameters, and set the visual template. When Control type is Strategy Run Record Selector, you can select the current_job as Value to perform attribution for the current results.
Export: Export the preset as a JSON format file to the local system.
Delete: Delete the current preset.
Batch Delete: Select multiple presets for batch deletion.
Attribution Templates
Users can customize attribution templates to evaluate strategy results. All users with strategy permissions share this page, meaning template code is public. Starfish comes with built-in templates Campisi and Brinson.

Create: Create a new attribution template.

Edit: Click a template name or click Createafter the new template creation to enter the editing page.
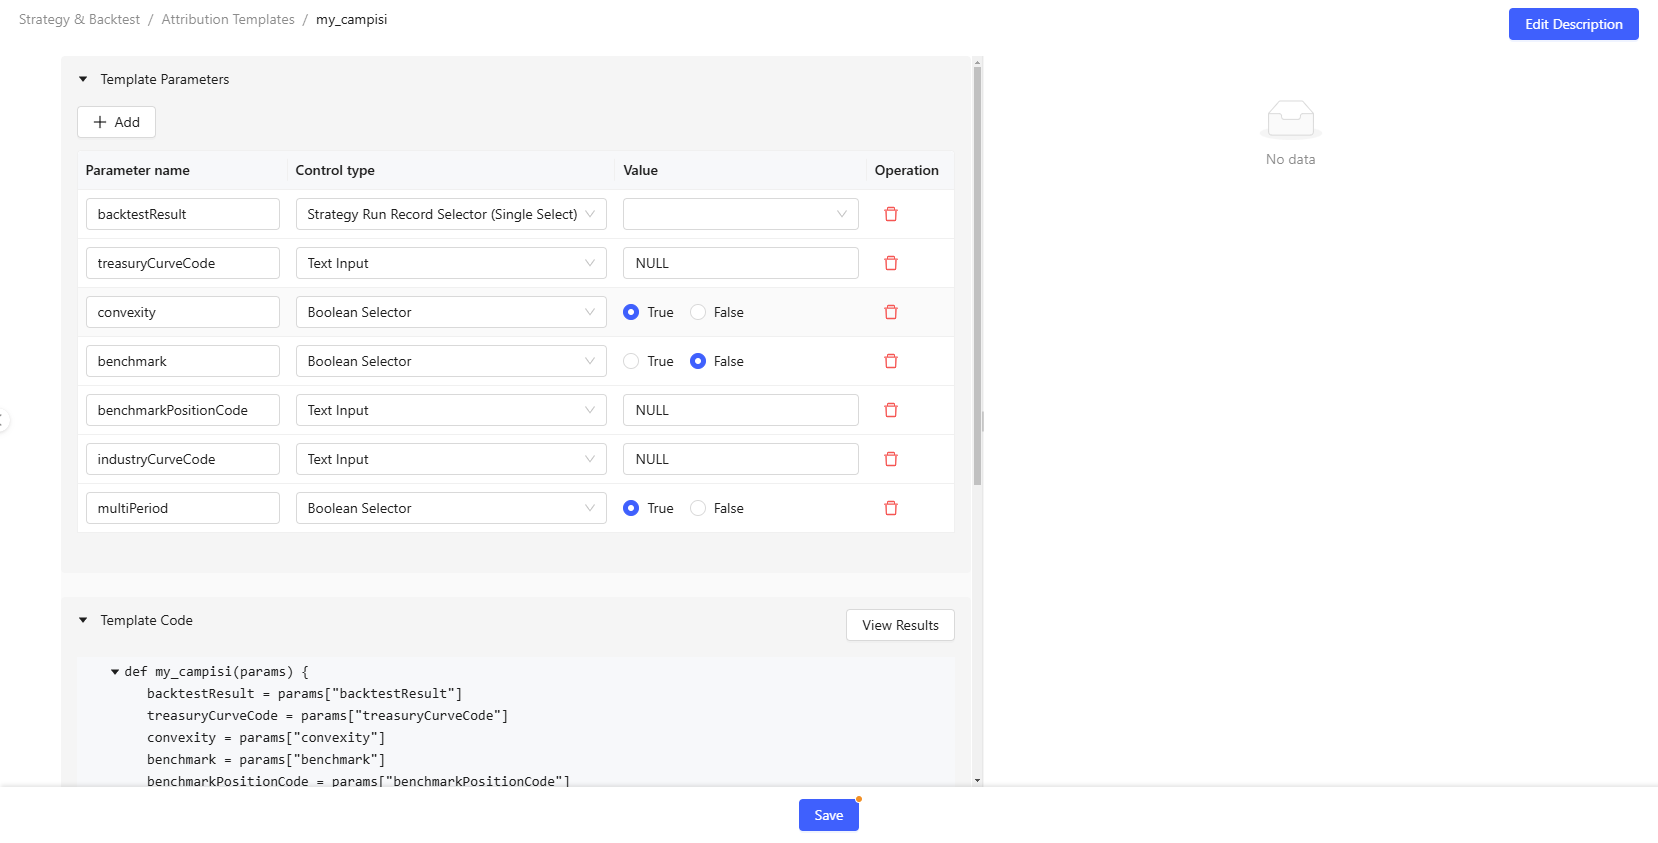
- You can add template parameters, select the corresponding control type and default value. Since the template parameters are a dictionary, after adding a new parameter, the corresponding code for the parameter will be automatically generated.
- The function's return must be a dictionary.
- Click View Results to test the current code and parameter inputs. The default result is a dashboard containing all results. You can also switch to the JSON mode to view the results in JSON format.
- After editing all parameters and code, click the Save to save all information.
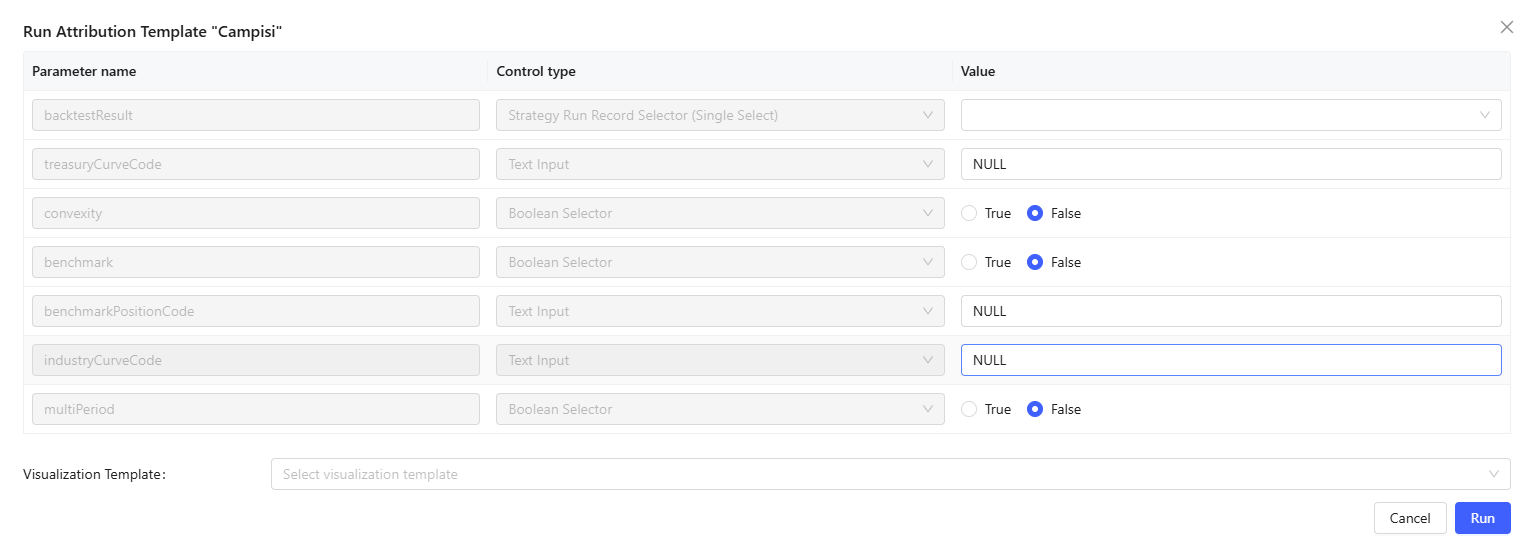
Run: Click Run, specify the parameter values, and select a visual template if needed. Click Run to run the performance attribution task.
Delete: Delete the attribution template.