Data Management
The Data Management module efficiently manages databases and tables. This module provides the following features:
- Users can view accessible databases/tables
- Department administrators can manage permissions for the databases/tables.
- The system administrator (admin) can set database prefixes that specific users and departments are allowed to create.
- Users with data import permissions can perform data import operations.
Database Overview
Accessible Tables
This tab displays accessible databases and tables by the current user.

Clicking a specific database will display the current user’s database-level access on the right.
Clicking a specific table will display the current user’s table-level access and schema information, including column names, data types, comment, etc.
Managed Tables
This tab is only accessible to users with DB_OWNER and DB_MANAGE access. It displays databases/tables managed by the user and their access information.

Clicking the + before a specific database will expand to show a list of users/departments with related access, their database-level access, and tables contained in the database.
Clicking the + before a specific table will expand to show a list of users/departments with related access, and their table-level access.
When hovering over a database/table, a settings button (⚙) will appear. Clicking this button to manage user access.

The steps for managing user access for a database or table are as follows:
- Select Access Operation (ALLOW, DENY, or REVOKE).
- Select Object Type (user or department).
- Select Object.
- Select Access Type.
- Click +Add to check if the operations in the Operation List meet expectations.
- Click Confirm.
The operation status will be displayed in the upper right corner of the page, and users can view details for specific information. Operation history can be checked at Access Operations at the upper right corner.
Creation Permissions
This page is only accessible to admin. It displays a list of users, whether they have data import permissions and the table prefixes they are allowed to create.
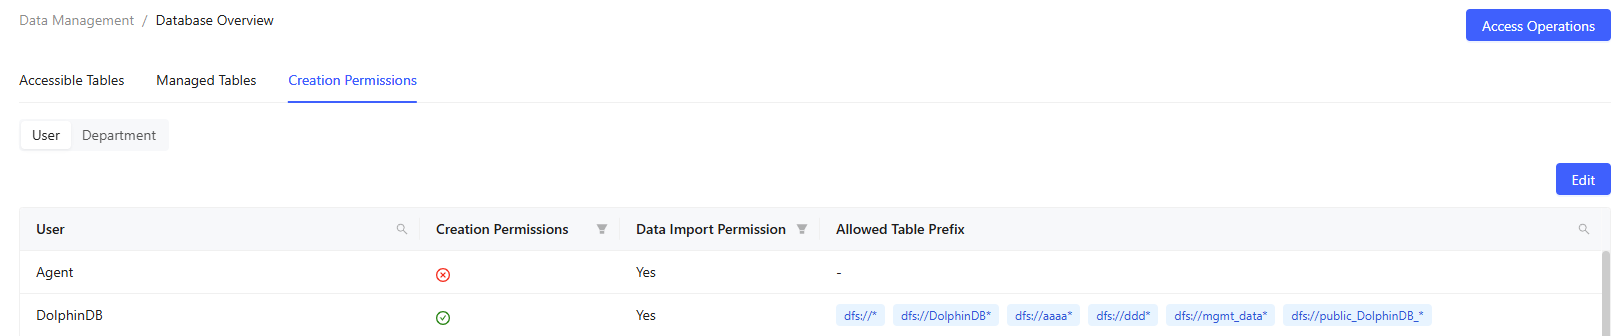
- Edit: Manage the database/table prefixes that users or departments are allowed to create.
The steps for editing creatable prefixes are as follows:
- Select Access Operation (ALLOW, DENY, or REVOKE).
- Select Object Type (user or department).
- Select Object.
- Specify Prefix, which must end with
*. - Click +Add to check if the operations meet expectations.
- Click Edit.
The operation status will be displayed in the upper right corner of the page, and users can view details for specific information. Operation history can be checked at Access Operations at the upper right corner.
Data Import Templates
This page is only accessible to users with data import permissions, and all data import templates are available to users with such permissions. It displays all import templates in the current cluster, including template name, tags, execution count, creator, creation time, update time, comment, etc. The platform provides various built-in templates.

- Create: Open the Create Template window.
Create Import Templates
Fill in the basic information of the data import template:
- Name: The template name. It must not duplicate any template name.
- Tags: Set tags for the template.
- Comment: Add comments for the template.
Edit Import Templates
Click a template name, or click Create after the new template creation to
open the template editor. The template must include a user-defined function. The
function name must match the template name, and the body specifies the data
import operations. It is recommended to include parameters named dbName
and tbName in the function to allow the platform to display the
database/table in the task details. If the template includes batch job
submissions using submitJob or submitJobEx, it
is recommended to return the job IDs to facilitate platform monitoring of job
execution status.
Run Import Templates
Click the Run button under the Operation column to run data import templates.
- Template Parameters: Fill in the data types and values for the parameters. For built-in templates, the data types are fixed.
- Use preset: Use a preset parameter configuration.
- Save preset: Save the parameter configuration and bind it to the template. Please specify a unique name for the preset when saving it.
- Import: Import a JSON file that contains the parameter configuration locally.
- Export: Export the current configuration to local in JSON file format.
Click Run to perform data import.
View Template Code
Use the View Code button to check the source code of the template.
Delete Import Templates
Only the template creator, admin, and users with review permissions can perform deletions.
The Delete button under the Operation column deletes the current template.
The Batch Delete button deletes multiple selected templates.