Scale out a DolphinDB Cluster
About DolphinDB Cluster
A DolphinDB cluster has 4 types of nodes: controller, agent, data node, and compute node.
- A controller manages the metadata of a cluster and provides the web-based cluster manager.
A controller has the following 3 configuration files:
- controller.cfg: the configuration parameters for the controller, such as IP address, port number, the maximum number of connections, etc.
- cluster.nodes: all nodes in the cluster. The controller uses this file to get information of the cluster nodes.
- cluster.cfg: individual configuration of each node in the cluster, such as parameter volumes of a node.
- An agent is deployed on each physical machine and is responsible for starting and stopping local data nodes. The configuration file on the agent is:
- agent.cfg: specifies properties relevant to the agent node, such as IP and port, the cluster's controller, etc.
- A data node is used for data storage and computation. You can create distributed databases and tables on a data node.
- A compute node is only used for computation, including stream computing, distributed join and machine learning. Data is not stored on a compute node, and therefore we cannot create a database or table on it.
Follow the following steps to add a new physical machine to a cluster:
- Deploy an agent node on the new server and configure the file agent.cfg
- Register information about the new agent node and new data nodes with the controller
- Restart the controller and all data nodes
To expand the storage space of an existing data node, we can modify the node configuration file to add a path to parameter volumes.
Add Data Nodes
The following example will add a new physical server to a cluster and deploy a data node on it. Starting from 1.30.4, you can add a data node dynamically without restarting the cluster.
The original cluster has the following 4 servers on ubuntu 16.04 using DolphinDB 16.04:
172.18.0.10 : controller
172.18.0.11 : datanode1
172.18.0.12 : datanode2
172.18.0.13 : datanode3
The cluster has the following configuration files:
controller.cfg
localSite=172.18.0.10:8990:ctl8990cluster.nodes
localSite,mode
172.18.0.11:8701:agent1,agent
172.18.0.12:8701:agent2,agent
172.18.0.13:8701:agent3,agent
172.18.0.11:8801:node1,datanode
172.18.0.12:8802:node2,datanode
172.18.0.13:8803:node3,datanode
The command line to start the controller:
nohup ./dolphindb -console 0 -mode controller -script dolphindb.dos -config config/controller.cfg -logFile log/controller.log -nodesFile config/cluster.nodes &The command line to start the agent:
./dolphindb -mode agent -home data -script dolphindb.dos -config config/agent.cfg -logFile log/agent.logCreate a partitioned database in the cluster:
data = table(1..1000 as id,rand(`A`B`C,1000) as name)
db = database("dfs://scaleout_test_db",RANGE,cutPoints(1..2000,10))
tb = db.createPartitionedTable(data,"scaleoutTB",`id)
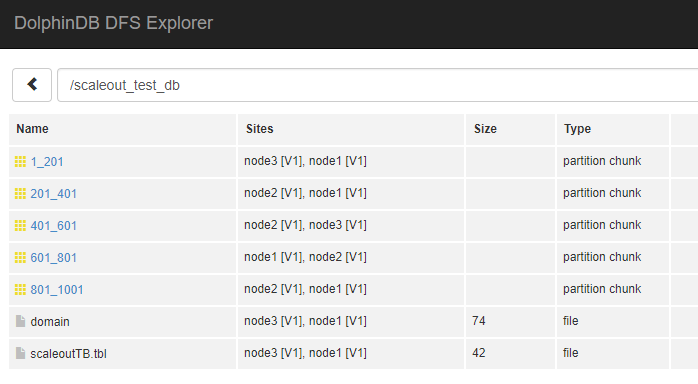
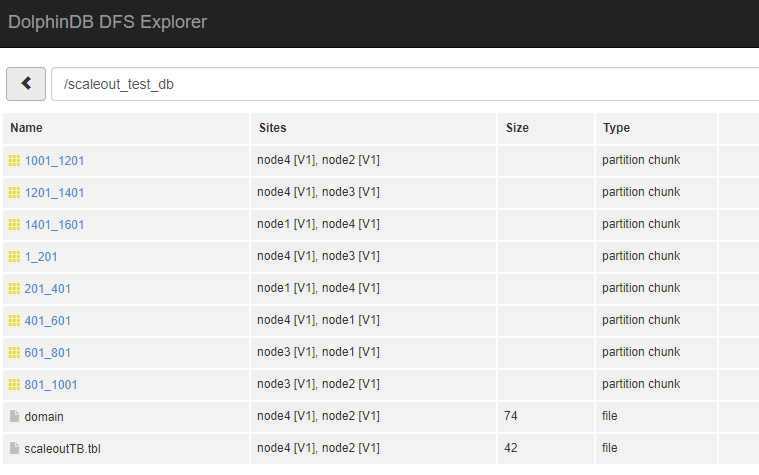
tb.append!(data)We can browse the data in the DFS Explorer of the cluster web interface.
Note: For more details about cluster configuration, please refer to DolphinDB Multi-Machine Cluster Deployment
The IP address of the new machine:
172.18.0.14The IP address, port number and the unique alias name of the new data node in the cluster:
172.18.0.14:8804:datanode4Add a Data Node Offline
Configure the Agent
Agent node is deployed in the directory /home/<DolphinDBRoot>. Copy the files in the directory on any server to the directory /home/<DolphinDBRoot> of the new machine, and modify "/home/<DolphinDBRoot>/config/agent.cfg" as follows:
//specify the IP address and port number of the new agent
localSite=172.18.0.14:8701:agent4

//the controller information
controllerSite=172.18.0.10:8990:ctl8990

Mode=agent
Configure Controller
Modify the file cluster.nodes to include the new agent node and data node:
localSite,mode
172.18.0.11:8701:agent1,agent
172.18.0.12:8701:agent2,agent
172.18.0.13:8701:agent3,agent
172.18.0.11:8801:node1,datanode
172.18.0.12:8802:node2,datanode
172.18.0.13:8803:node3,datanode

//new agent node and data node
172.18.0.14:8704:agent4,agent
172.18.0.14:8804:node4,datanode
Restart the cluster
Restart the entire cluster, including the controller and all data nodes.
- Close all data nodes on the web interface
http://172.18.0.10:8990.
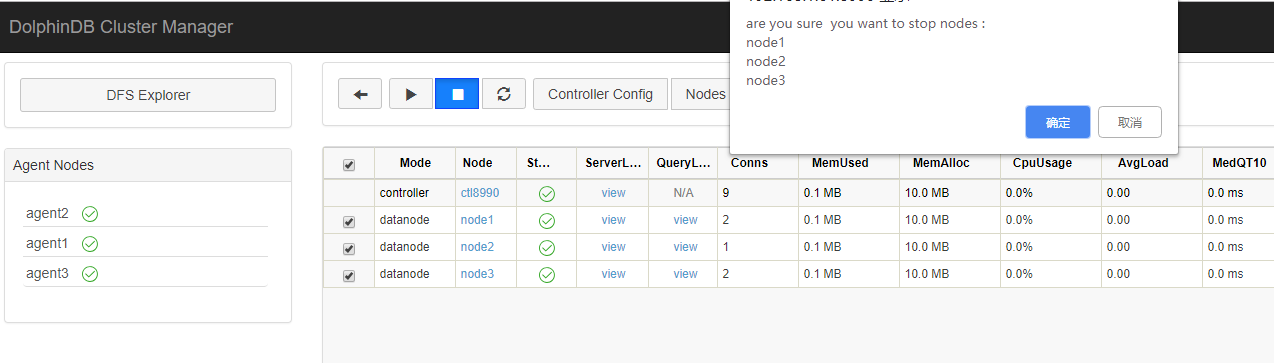
Execute
pkill dolphindbon the server (172.18.0.10) to shut down the controller.After waiting for about half a minute (for the port to be released), restart the controller.
Back to the web interface, you can see that a new agent node has been added and is started, and all data nodes are started.
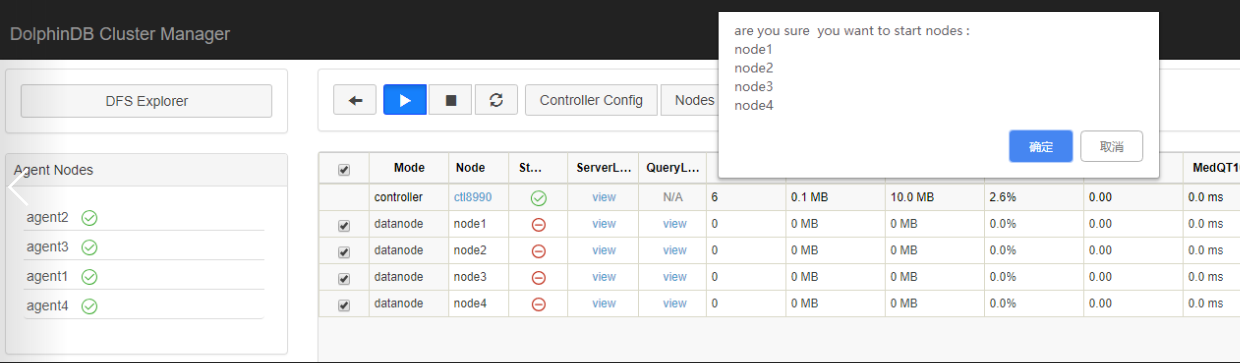
By now we have successfully added a new server and a new data node to the cluster.
Add a Data Node Online
The modification on configurations when adding a data node online is the same as described in Section "Add a Data Node Offline". After configuring agent.cfg and cluster.nodes, please start the agent, connect to the controller via web interface or GUI, and execute the following code:
addAgentToController("172.18.0.14:8704:agent4");
addNode("172.18.0.14",8804,"node4");
Back to the web interface, you can see that a new agent node has been added. Execute sh startAgent.sh to start the agent and start all data nodes via the web interface. By now we have successfully added a new data node online.
Verification
Let's verify that the new data node is enabled in the cluster by writing some data to the cluster.
Tb = database("dfs://scaleout_test_db").loadTable("scaleoutTB")
Tb.append!(table(1001..1500 as id,rand(`A`B`C,500) as name))
In the DFS Explorer, you should see that the data has been populated to the new data node.
Add Hard Disks to a Data Node
The storage capacity of existing data nodes might become insufficient. The following example explains how to add a hard disk to node3.
The storage paths can be specified with the configuration parameter volumes. The default storage path is <HomeDir>/<Data Node Alias>/storage.
Note If you add a disk from the default path, you must explicitly set the original default path when specifying the parameter volumes. Otherwise, the metadata will be lost in the default path.
The default value for parameter volumes is as follows. You need to add it to the configuration file if it doesn't exist there.
cluster.cfg
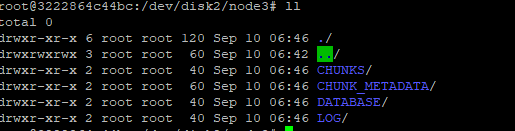
node3.volumes=/home/server/data/node3/storage To add the new disk path /dev/disk2/node3 to node3, just add the path to the line above after a comma.
cluster.cfg
node3.volumes=/home/server/data/node3/storage,/dev/disk2/node3After modifying the configuration file, execute loadClusterNodesConfigs() on the controller to reload the configuration parameters. If the steps above are completed on the web interface, configuration parameters are automatically reloaded, and we don't need to execute loadClusterNodesConfigs(). After the configuration is completed, there is no need to restart the controller. Just restart node3 on the web interface so that the new configuration can take effect.
Note: If you would like the new storage to take effect immediately without restarting node3, you can execute addVolumes("/dev/disk2/node3") on node3. However, this will not be effective any more after the cluster restarts.
After the configuration is completed, execute the following script to write data to the cluster and check if data is written to the new disk.
tb = database("dfs://scaleout_test_db").loadTable("scaleoutTB")
tb.append!(table(1501..2000 as id,rand(`A`B`C,500) as name))
Data has been written to the disk: