
MCP User Guide
Starting from version 3.00.4, DolphinDB natively supports MCP Server. After you deploy DolphinDB Server version 3.00.4 or later, you can use it as an MCP Server. This article describes the complete workflow, from deploying an MCP Server and developing MCP tools to connecting to, using, and testing the MCP Server.
1. Deploy the MCP Server
- Download DolphinDB Server version 3.00.4 or later.
- Deploy it by referring to the documentation.
- Log in to the MCP Server and verify that the MCP feature can be
used.
login(`user,password)
// Get the MCP Server token for the current account
getAuthenticatedUserTicket()
// View the MCP tools published on the current server
listMCPTools()
1.1 Cluster Deployment
DolphinDB MCP Server supports cluster deployment. When a tool is called, it runs on the corresponding data node or compute node and returns the result to the client. Suppose the cluster includes a controller (ip:port1), a compute node (ip:port2), and a data node (ip:port3). You can define a tool on any node. When you call it, the tool runs on the node that receives the call. For example, if you call it through ip:port2/mcp, the tool runs on ip:port2.
1.2 Permission Control
MCP Server supports role-based permission management and is compatible with DolphinDB's existing user and user group system. In addition, an explicit grant + deny-precedence model is adopted to ensure flexible control.
Supported permission types
| Permission Identifier | Scope | Description |
|---|---|---|
| MCP_MANAGE | Global | MCP resource administrator: Can publish/unpublish tools, resources, and prompts. Suitable for O&M staff. |
| MCP_DEVELOP | Global | MCP tool developer: Can create/modify/delete/view tools, resources, and prompts. Suitable for developers. |
| MCP_EXEC | Resource-level | MCP executor: Can call endpoints such as
tools/*, prompts/*, and
resources/*. Suitable for users who call
MCP tools via a client. |
Functions for authorization
Use the grant function to authorize access and the deny function to revoke it. Examples:
// Grant userA permission to publish tools
grant(`userA, MCP_MANAGE)
// Grant userA permission to develop tools
grant(`userA, MCP_DEVELOP)
// Allow userA to execute the tool named fun1
grant(`userA, MCP_EXEC, "tools/fun1")
// Allow userA to execute all tools, including current and future ones
grant(`userA, MCP_EXEC, "tools/*")
// Grant userA access to all tools while explicitly denying one specific tool (deny takes precedence)
grant(`userA, MCP_EXEC, "tools/*")
deny(`userA, MCP_EXEC, "tools/fun1")
When an agent executes a tool, the system applies two layers of permission checks:
- It checks whether userA has permission to execute the MCP tool. If not, the tool cannot run.
- It checks whether userA has permission to perform operations required by the MCP tool, such as deleting databases or tables. If not, the tool cannot run.
2. Develop Tools
Refer to the MCP Tool Development Guide.
After development is complete, view the published tools:
// View published tools
print("Published Tools:")
print(listMCPTools())
3. Configure the MCP Server, Tools, and System Prompt on the Client
This chapter uses VS Code Copilot and Cherry Studio as examples to show how to configure MCP on the client.
3.1 Configure MCP in VS Code Copilot
3.1.1 Add an MCP Server
- Open the Copilot chat panel and click the Configure Tools button
in the lower-right corner.
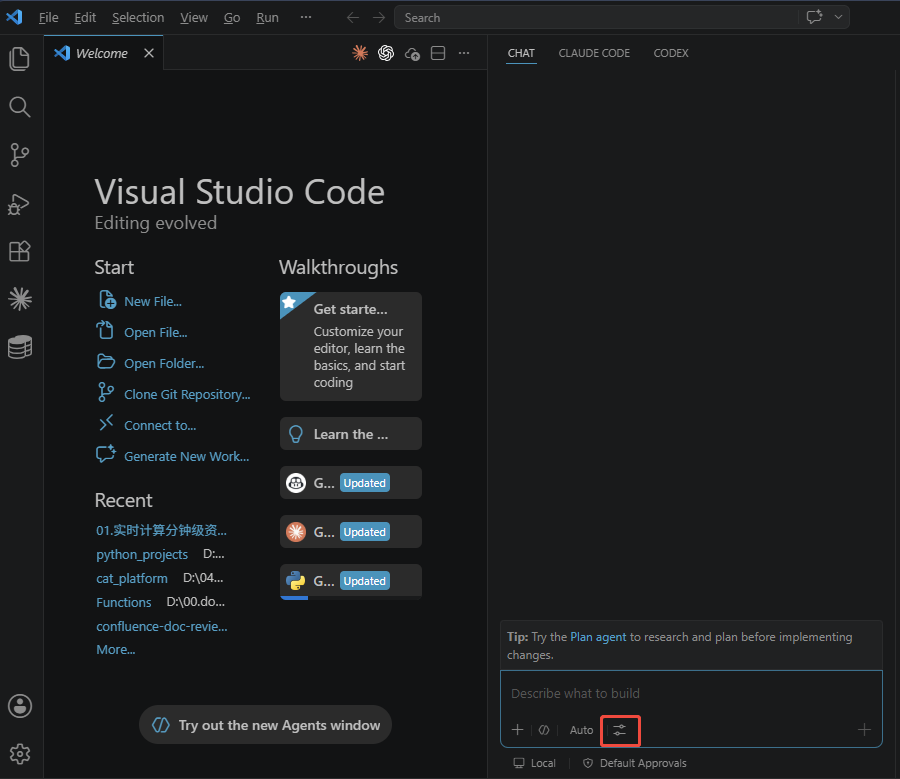
Figure 1. Figure 3-1 Configure Tools - Click Add MCP Server in the upper-right corner, and then select
HTTP mode.
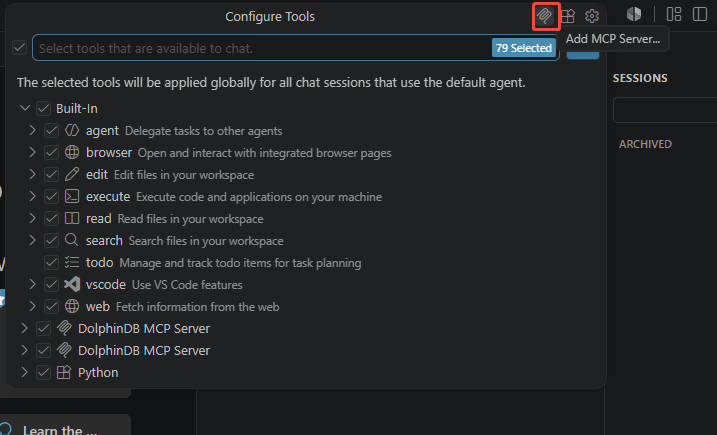
Figure 2. Figure 3-2 Add an MCP Server - Enter the MCP Server address:
http://ip:port/mcp. Note: Replace IP and port with the actual server IP and port you use. To enable HTTPS, setenableHTTPS=truein the configuration file: usedolphindb.cfgfor standalone deployment andcluster.cfgfor cluster deployment.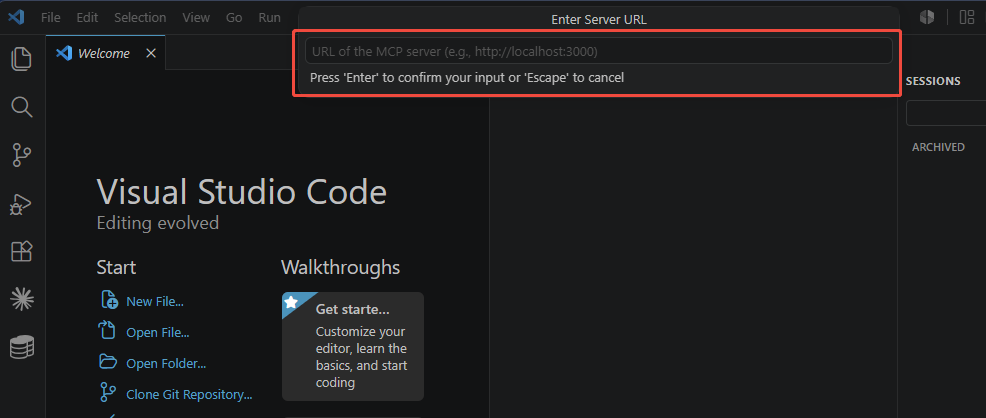
Figure 3. Figure 3-3 Enter the MCP Server Address - Enter an MCP Server name, such as "DDB MCP Server".
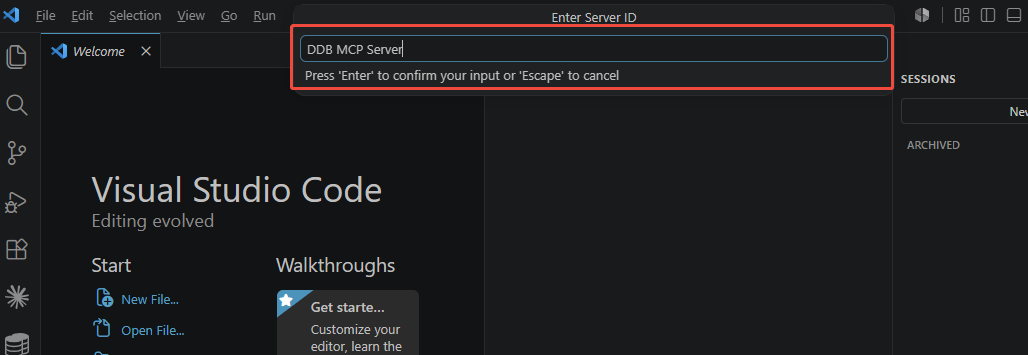
Figure 4. Figure 3-4 Enter the MCP Server name - Add the headers field to the mcp.json file, and then save the
file.
{
 "servers": {
 "DDB Agent": {
 "type": "http",
 "url": "http://ip:port/mcp",
 "headers": {
 "Authorization": "Bearer token"
 }
 }
 }
}
After you save the file, the client automatically detects the updated configuration and displays the Start button at the top. Click Start. The client automatically connects to the MCP Server based on the configuration, loads the MCP tools published on the server, and activates the configuration.
- Replace the IP, port, and token in the file with the actual server IP, port, and MCP token you want to use.
- An MCP token is an access credential issued by the server and has an
expiration period. If the token expires, log in to the server and
call
getAuthenticatedUserTicket()to obtain a new token before continuing to access the MCP service.
3.1.2 Start VS Code GitHub Copilot and Add MCP Tools
- Open VS Code, go to the Copilot chat panel, switch to Agent mode, and click the Configure Tools button in the lower-right corner.
- The list displays the MCP Server you have added.
- Below the MCP Server, you will see the list of tools published on the server. Check these tools so that Copilot can call them during the conversation.
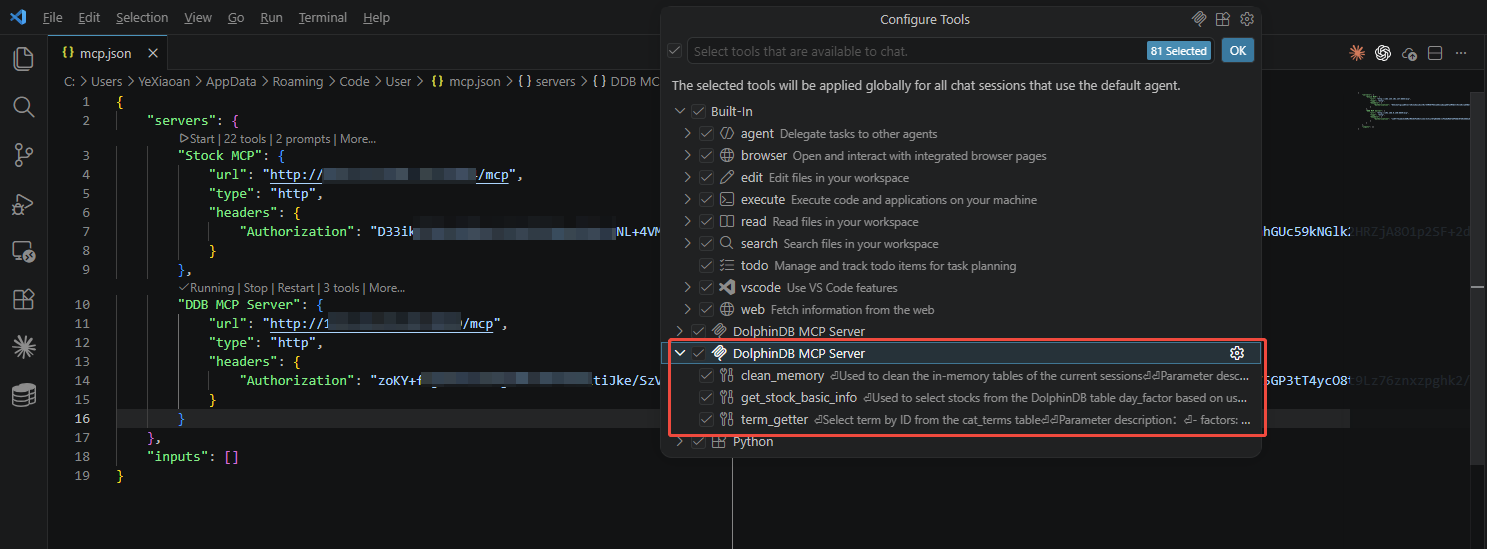
After you complete the preceding steps, you can start using MCP features in Copilot chat. The model automatically calls these tools to perform tasks based on the context.
3.2 Configure MCP in Cherry Studio
Prerequisite: To configure MCP in Cherry Studio, you must first obtain an API key for a model.
3.2.1 Add an MCP Server
- Open Cherry Studio and click the Settings button in the
upper-right corner.
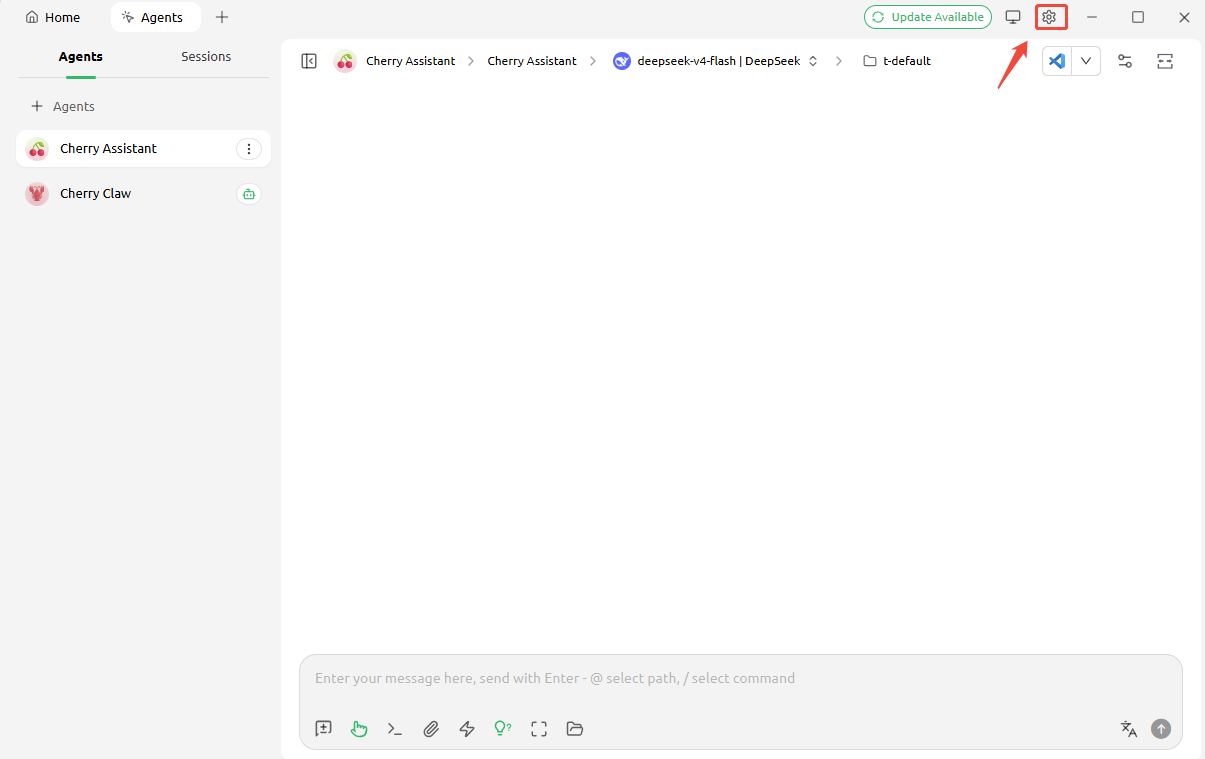
Figure 6. Figure 3-6 Settings - Select MCP Servers in the left sidebar, click Add in the
upper-right corner, and then select Quick Create.
Figure 7. Figure 3-7 Quick Create 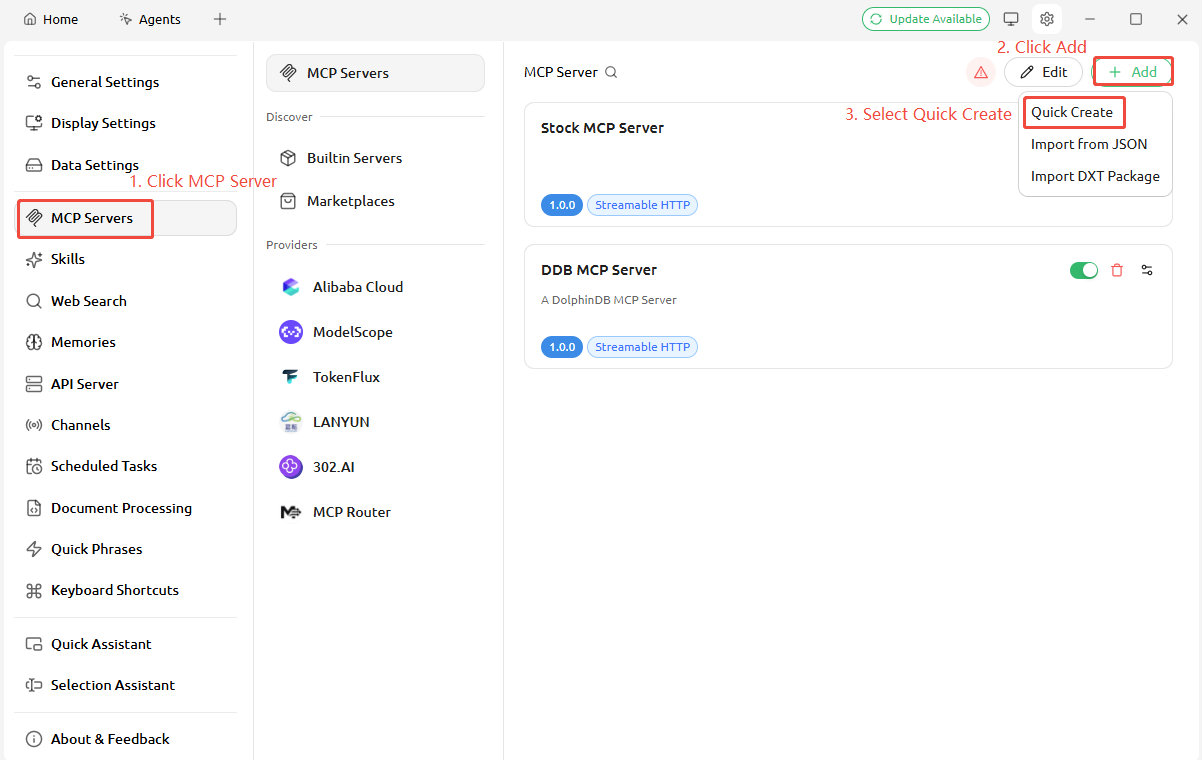
- Enter the MCP Server information. Set Type to Streamable HTTP
(streamableHttp). In the URL field, enter
http://your-server-ip:port/mcp. In the Headers field, enter Authorization=Bearer YOUR_TOKEN_HERE, and replace YOUR_TOKEN_HERE with the actual MCP token.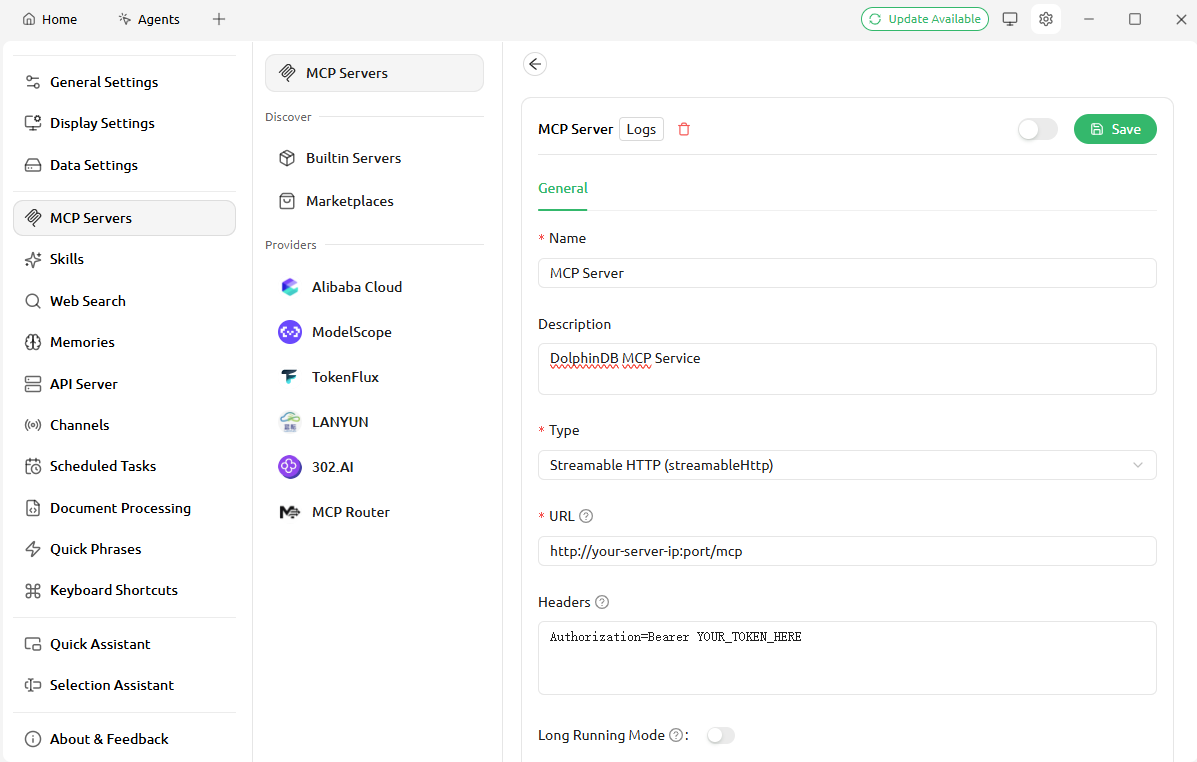
Figure 8. Figure 3-8 Enter the MCP Server Information - Click Save in the upper-right corner.
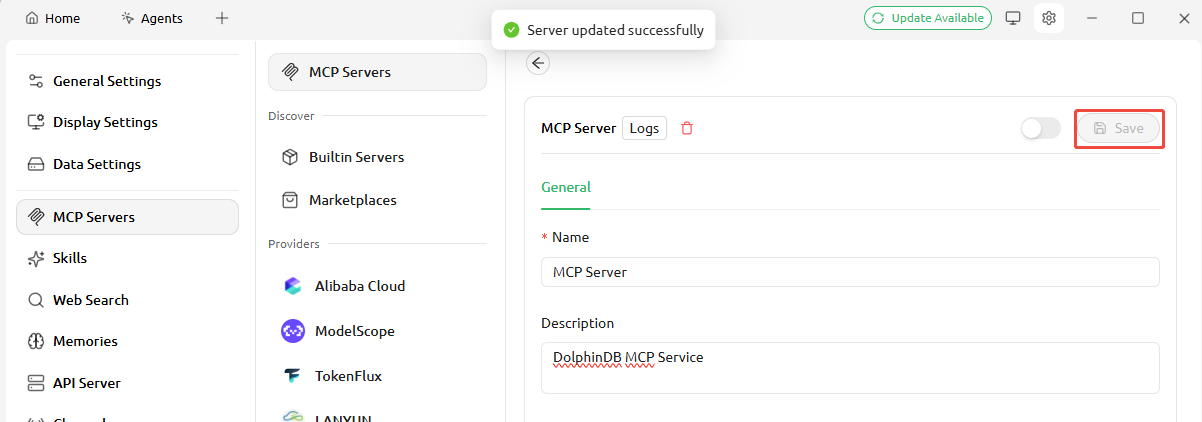
Figure 9. Figure 3-9 Save the Configuration - Return to the MCP settings page, where you can see the MCP Server you
added and enable it.
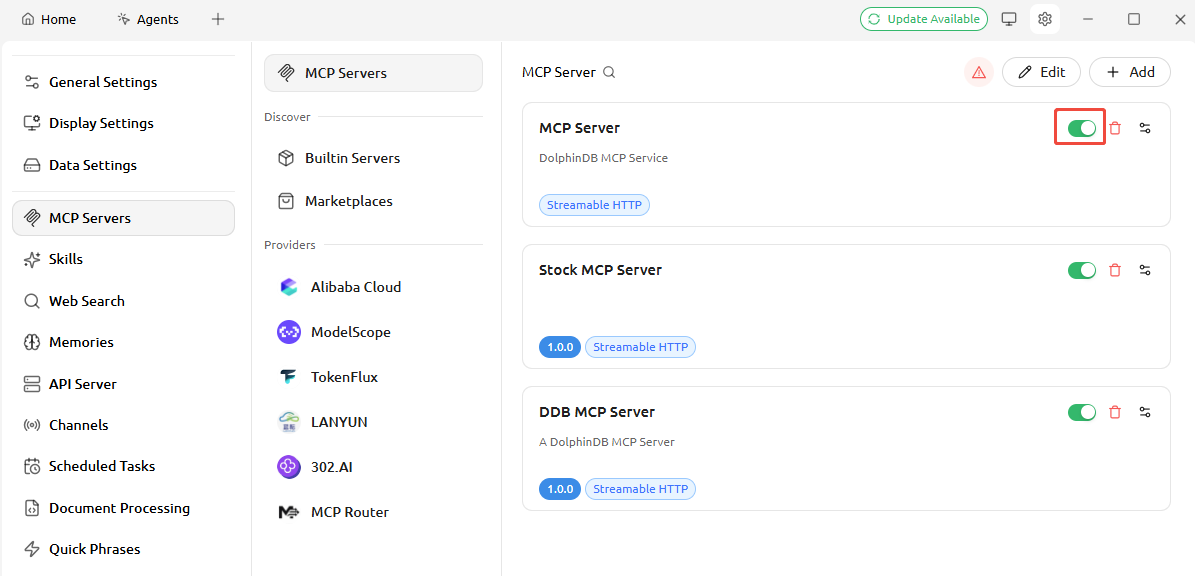
Figure 10. Figure 3-10 Enable the MCP Server - Click the MCP Server to enter the details page, where you can view and
manage MCP tools.
Figure 11. Figure 3-11 View MCP Tools 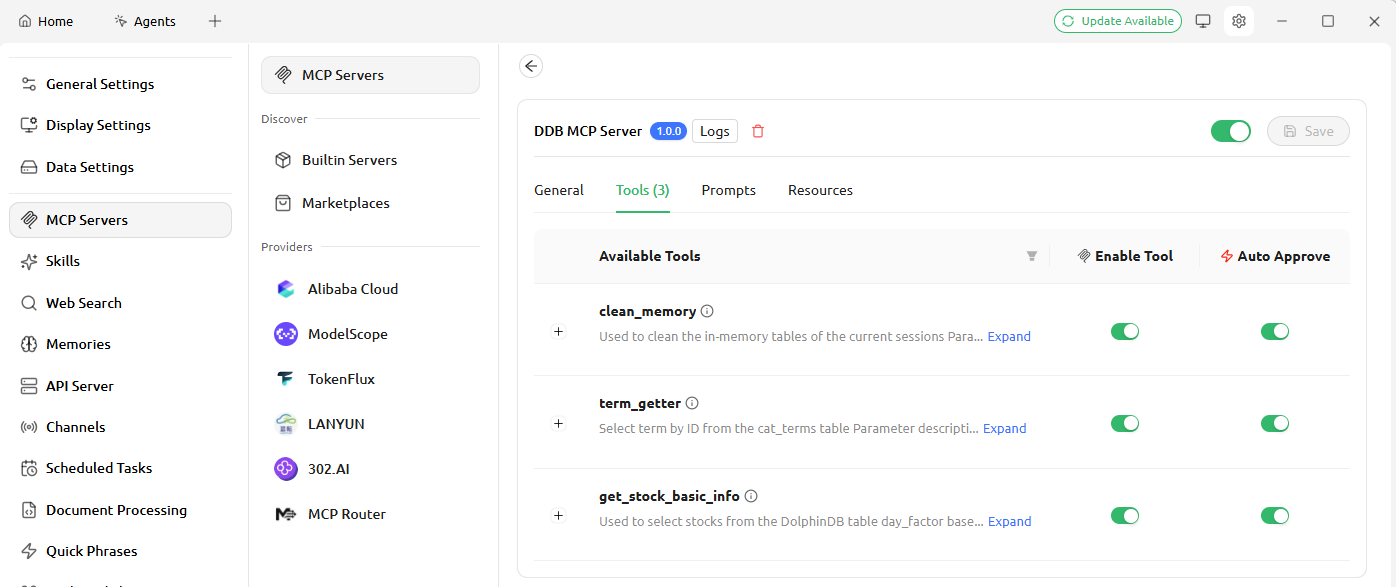
- Click Home in the upper-left corner, then open the Topics
tab. At the top, select a model, then choose the MCP Server you added
from the lower toolbar to start using MCP features.
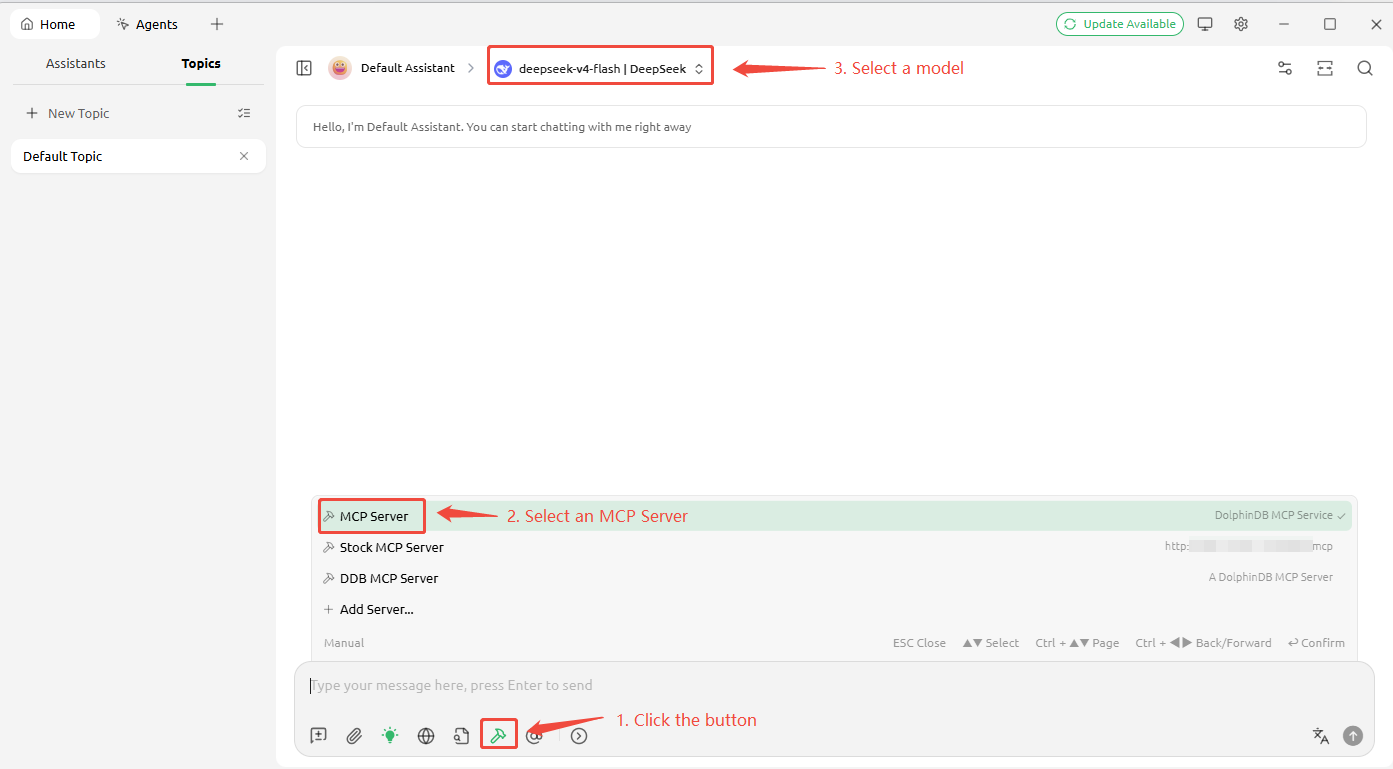
Figure 12. Figure 3-12 Add an MCP Server
3.2.2 Configure a Model
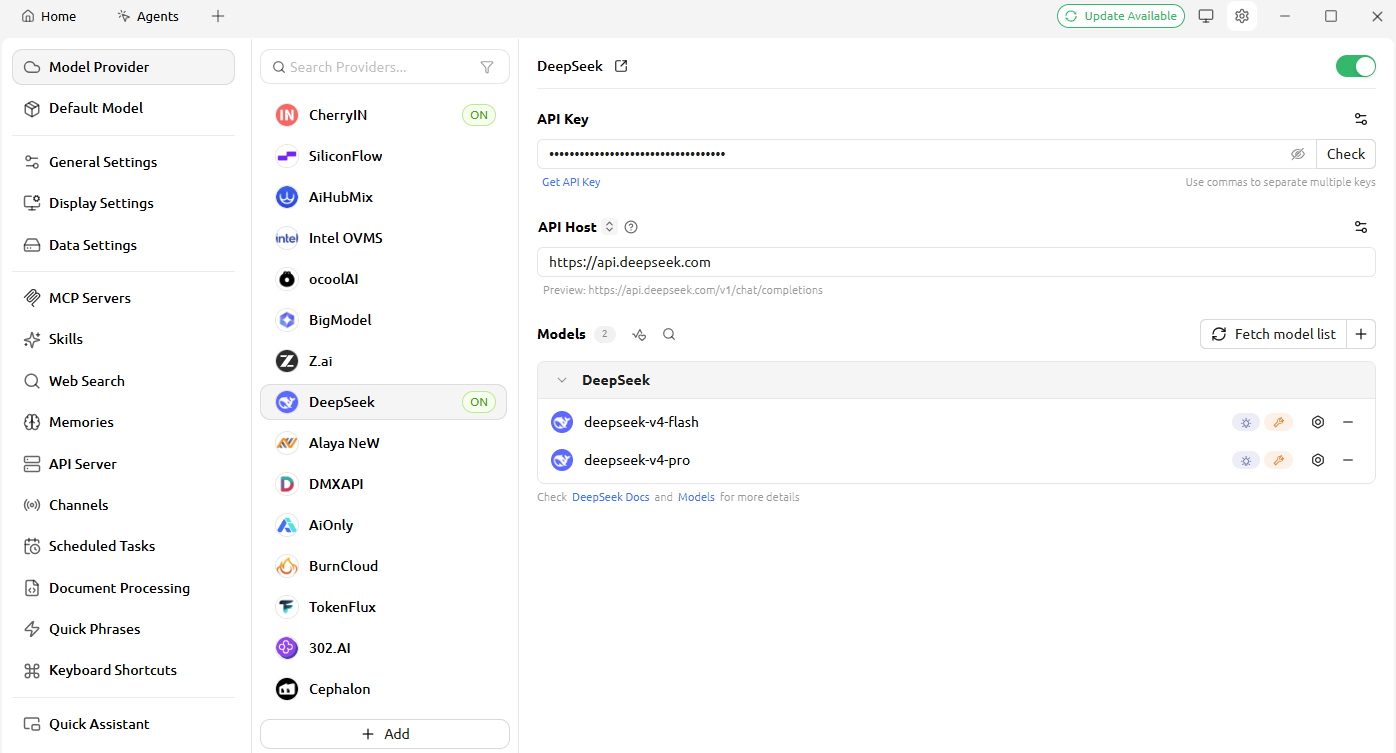
Enter the API key for the model you use so the client can access it.
Disable the proxy in General Settings to prevent it from blocking the connection to the MCP Server.
3.3 Configure MCP in Other Clients
In addition to the two clients described above, any MCP-compatible client, such as Claude Desktop, can also connect to the MCP Server.
4. Use and Test Tools
This chapter describes how to use and test MCP tools.
4.1 Usage Examples
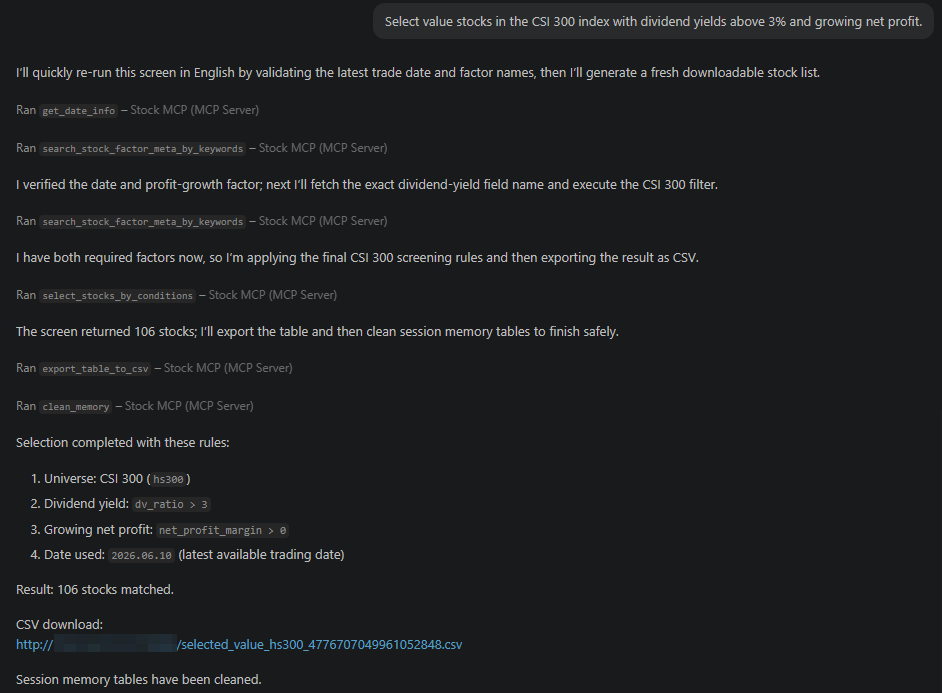
After you complete the configuration and select the required MCP tools, switch to Agent mode in the VS Code Copilot chat panel and enter a natural-language question to trigger an MCP tool call.
AI automatically selects and calls the appropriate tools based on your question, and it may call multiple tools in sequence within a single conversation to complete the task.
4.2 Test a Single Tool
If a tool description clearly states a typical use case, such as using monitor_memory_usage to monitor memory usage, you can test that tool by entering a natural-language question directly in the client. For example: "Is memory usage high? Does it need optimization?"
Expected agent behavior:
- Calls
monitor_memory_usageto retrieve memory usage. - Analyzes the data returned by the tool and provides optimization suggestions.
4.3 Test Multiple Tools
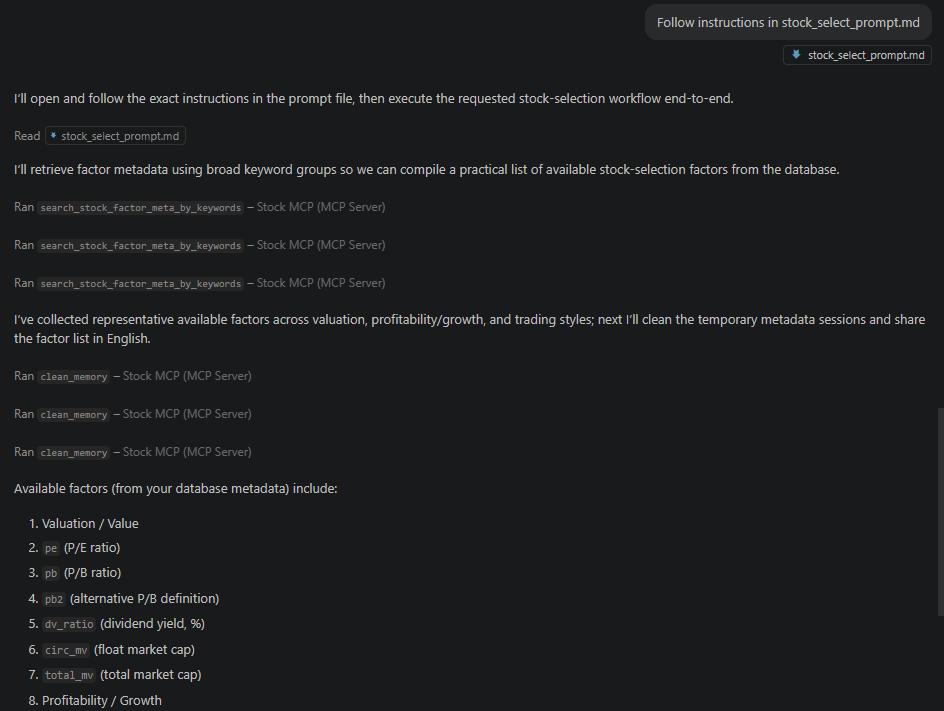
When you have many tools and complex coordination between them, we recommend configuring a System Prompt for a specific agent to guide how it orchestrates multiple tools to complete a task.
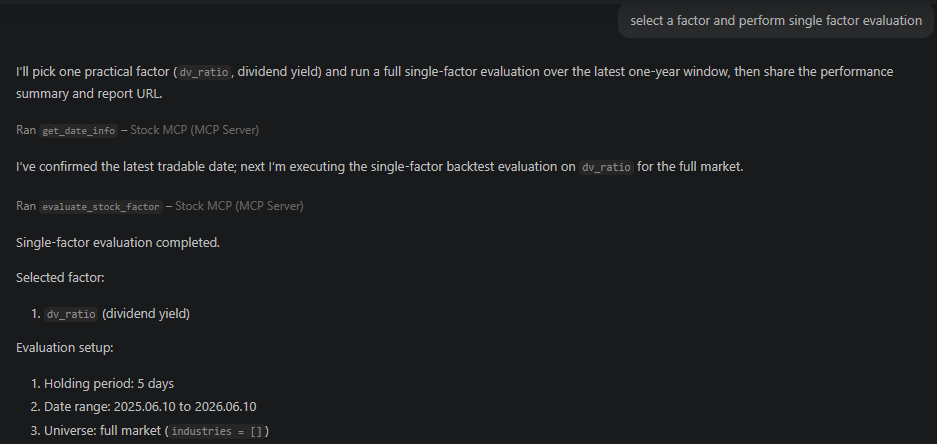
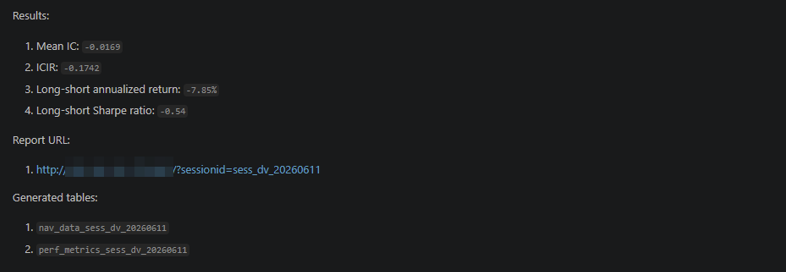
For example, when a "stock selection agent" queries a derived factor and performs a single-factor evaluation, the agent may trigger a multi-step tool workflow:
- First, it calls the factor query tool.
- Then, it calls the factor evaluation tool.
- The workflow may also involve data storage or temporary table management.
Each time the agent calls a tool, the MCP server performs the computation. The client is responsible only for preserving the context of input parameters and computation results and does not participate in the actual computation.
4.4 Test Tools with Inspector
After you finish developing a tool, you can validate it in either of the following ways:
- Test it directly in the client using natural language.
- Use the official MCP debugging tool, Inspector, to precisely debug a tool.
The following sections describe how to use MCP Inspector for tool-level debugging. For more information about Inspector, see MCP Inspector-Model Context Protocol.
4.4.1 Install and Start Inspector
Inspector is the official MCP debugging tool. You do not need to install it separately; you can run it using the npx command bundled with Node.js.
- Go to the official Node.js website to download Node.js.
- After installation, run the following command in PowerShell:npx @modelcontextprotocol/inspectorAfter it starts, your browser automatically opens the Inspector page.
4.4.2 Configure Inspector
On the Inspector page, complete the following steps.
- Copy the session token to the Proxy Session Token field on the
page.
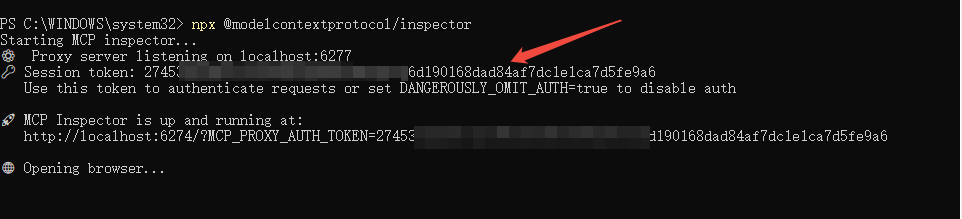
Figure 18. Figure 4-5 Get the Session Token 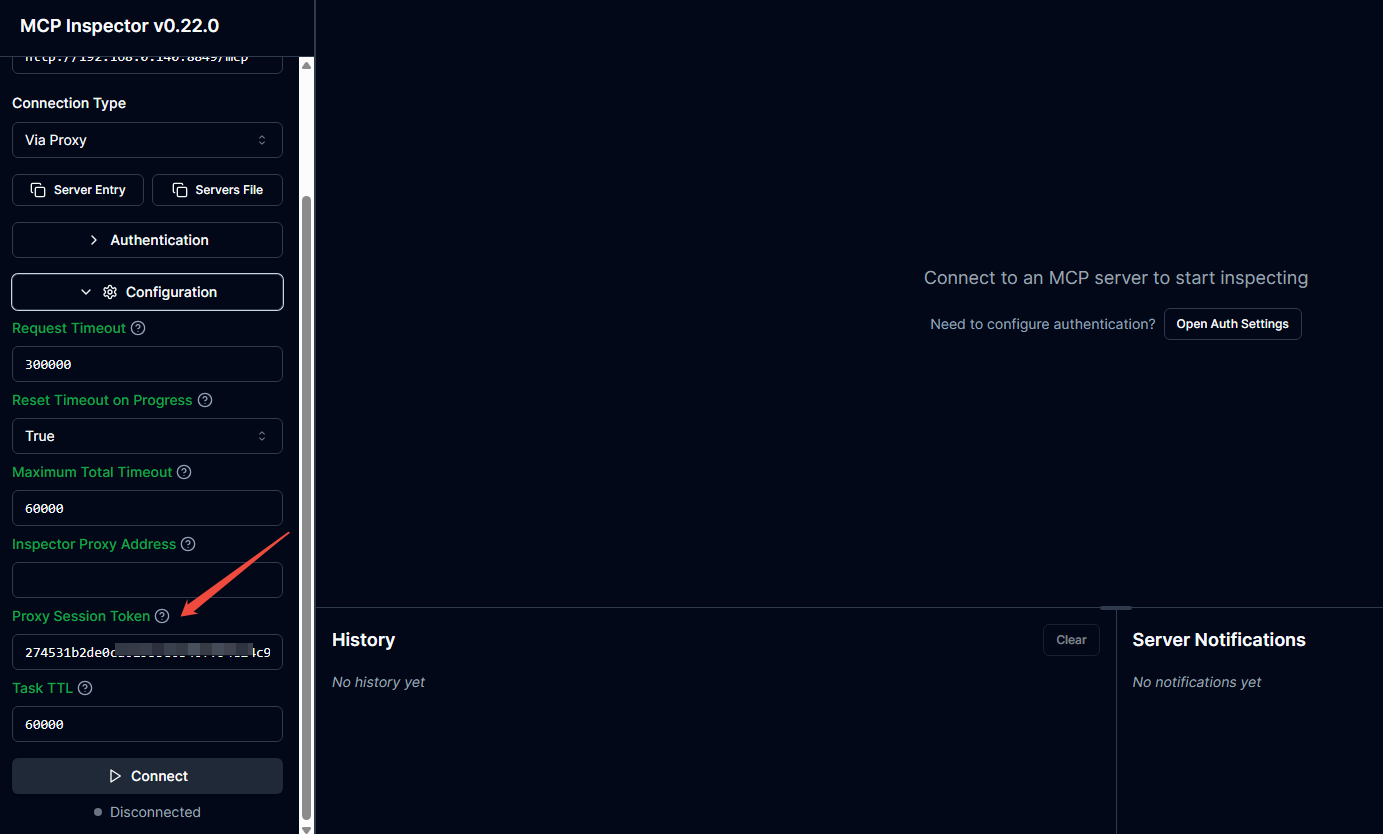
Figure 19. Figure 4-6 Paste the Session Token - Run
getAuthenticatedUserTicket()on the DolphinDB Server, and enter the returned token in the Bearer field. Note: MCP tool permission is checked based on the user's token. We recommend obtaining a token as the admin user. - Enter the MCP Server address in the URL field: http://ip:port/mcp.
- Set Transport Type to SSE or Streamable HTTP.
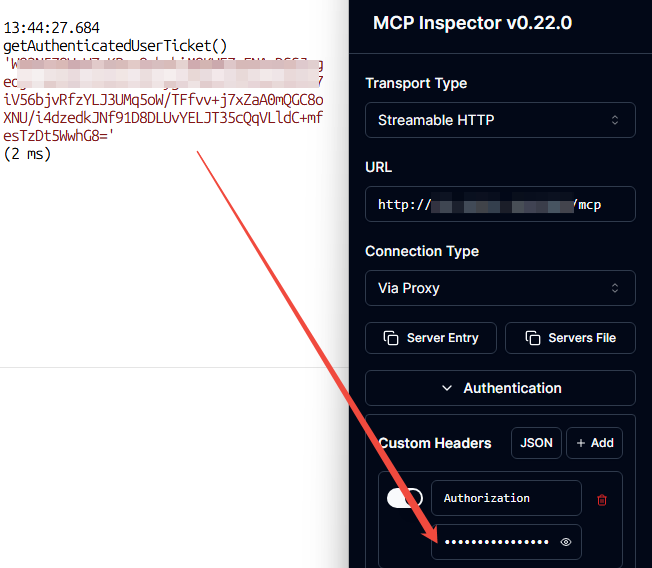
Figure 20. Figure 4-7 Configure MCP Server Information
4.4.3 Connect to and Debug Tools
- Click Connect to connect to the MCP Server.
- Click List Tools to display all MCP tools published on the server.
- Select a tool, then enter parameters on the right to test it.Input format: Values of type STRING do not require quotation marks. For STRING[] values, you can click Switch to JSON and enter them in standard JSON format.
- Click Run Tool to view the tool output on the right and verify
that it matches your expectations.
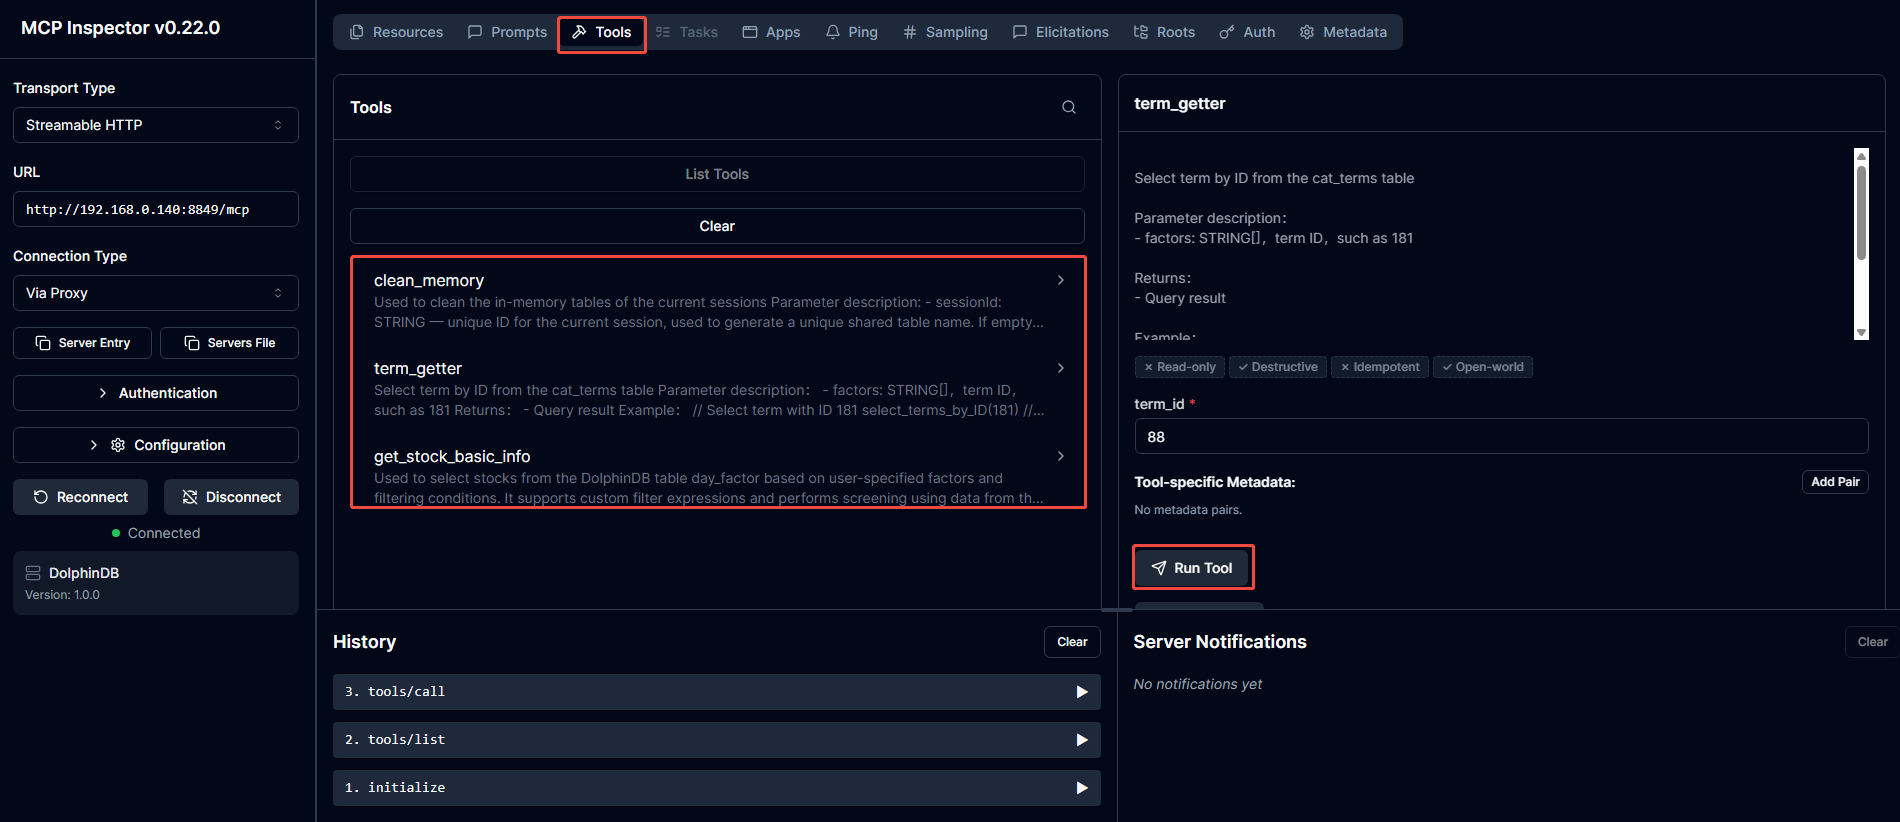
Figure 21. Figure 4-8 Debugging