Shell: Multi-Tab and Git Integration
As the Shell module in Web Interface is being extensively used, code management has become a challenge for many users. The single-editor model is no longer adequate for the growing complexity of code. Thus, DolphinDB supports multi-table code editing and Git integration features for the Shell module. This tutorial provides a detailed guide on how to use these two features, helping users quickly master efficient code management techniques, and improve development productivity.
1. Background
The Shell module in the Web Interface, designed to provide convenient and rich features, has been widely adopted. However, as team collaboration demands increase, the previous architecture based on a single-editor page had certain limitations in code management and gradually failed to meet the growing needs of users.
Specifically, we observed two typical user behavior patterns. One group stores a large number of code snippets with different functions in a single editor and selectively executes parts of them. While flexible for small scripts, this method becomes inefficient as the codebase grows, making navigation and maintenance harder, leading to disorganized code, reduced productivity, and increased error risk.
The other group uses external platforms like Git repositories for code management, copying code into the Web Interface's editor when needed. Although this leverages version control and collaboration features, it introduces new issues. Frequent copy-pasting not only becomes cumbersome and time-consuming but also increases the likelihood of human errors. Moreover, it separates the code's editing environment from its storage environment, making version management and synchronization more complicated.
To address these issues and further enhance the practicality and convenience of Shell, we have introduced two significant improvements: adding multi-tab editor and Git integration (currently supporting GitHub and GitLab).
2. Multi-Tab Editor
Since version 3.00.2.1, DolphinDB Web Interface supports a multi-tab editor, allowing you to manage code in Shell using tabs. Users can easily manage multiple DolphinDB scripts just like using web browsers.
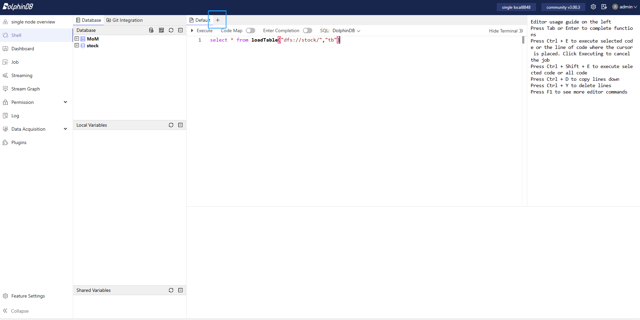
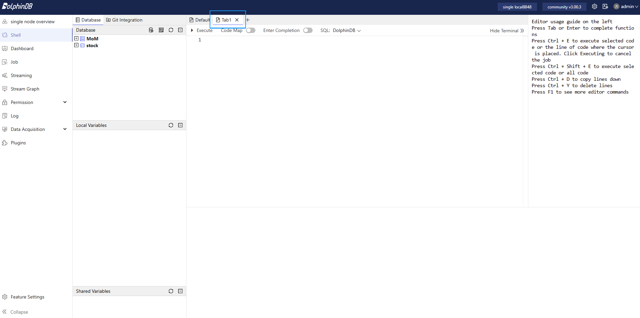
2.1 Creating a New Tab
Click the + button at the top of the editor area to create a new tab. Each tab represents an independent code editing and storage area, where different DolphinDB scripts can be written and executed.
2.2 Renaming the Tab
Double-click the title of a tab to rename it. Clear tab names help differentiate between different scripts. For example, you can use the file name, a functional description, or other meaningful names to rename the tabs.
2.3 Closing the Tab

Click the x button to the right of the tab title to close the tab.
Note: The content of the tab is stored in the browser's local storage. Closing the browser or deleting browsing data will result in the loss of the tab's content, which cannot be recovered. Please be sure to regularly save important code to DolphinDB scripts or Git repositories.
The multi-tab editor allows you to handle multiple DolphinDB scripts simultaneously, making it easy to switch between, organize, and manage code, significantly improving work efficiency.
3. Git Integration
Since version 3.00.2.5, DolphinDB Web Interface supports Git integration, allowing direct connection to GitHub or GitLab repositories for version control, collaborative editing, and easy code synchronization.
3.1 Connecting to a Git Account
First, connect your GitHub or GitLab account to the DolphinDB's Shell module. Currently, we support the following four connection methods:
GitLab Access Token
Obtain a GitLab Personal Access Token (Personal access tokens | GitLab)
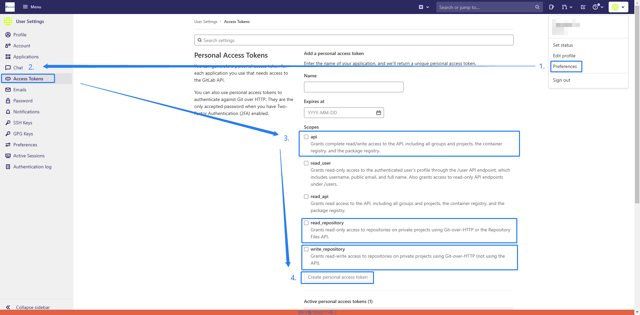
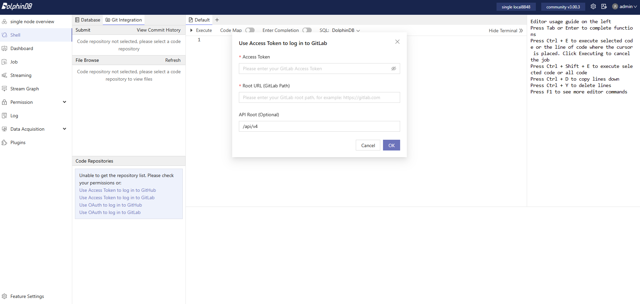
In the DolphinDB Web Interface, enter the Access Token, GitLab Root URL (e.g., https://gitlab.example.com) and the API Root path (usually /api/v4, optional).
GitLab OAuth
Create an application in GitLab (Create a user-owned application) and obtain the Application ID (i.e., Client ID).
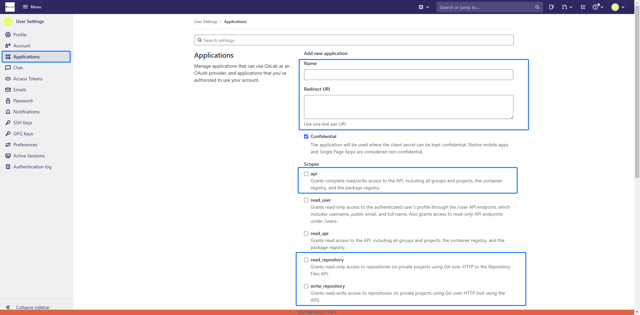
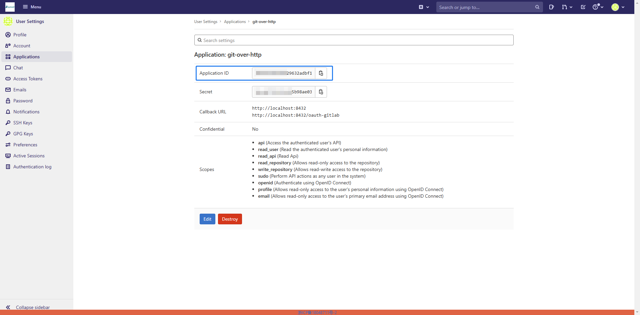
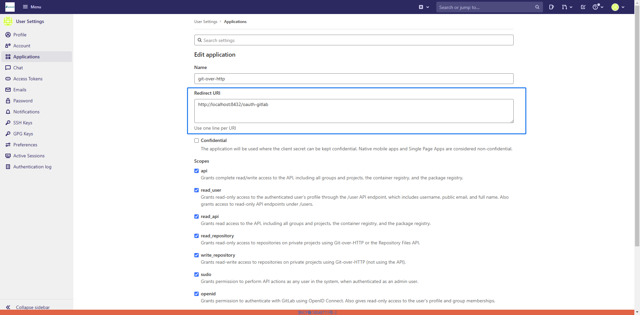
Set the Redirect URL to the DolphinDB Web deployment address with the /oauth-gitlab path (e.g., your-dolphindb-web-address/oauth-gitlab). The example here is for a DolphinDB Web instance started locally, where the Redirect URL is set to http://localhost:8432/oauth-gitlab.
-
In the DolphinDB Web Interface, enter the Client ID and click OK. The page will then be redirected to the GitLab authorization page for authorization.
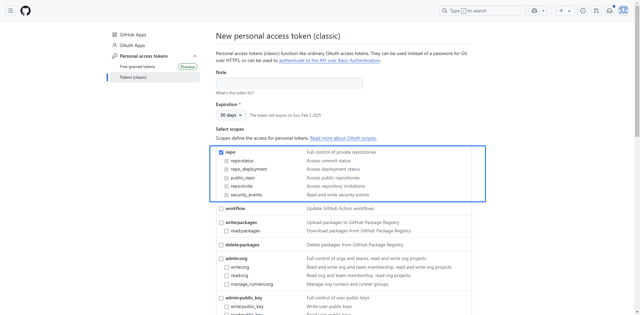
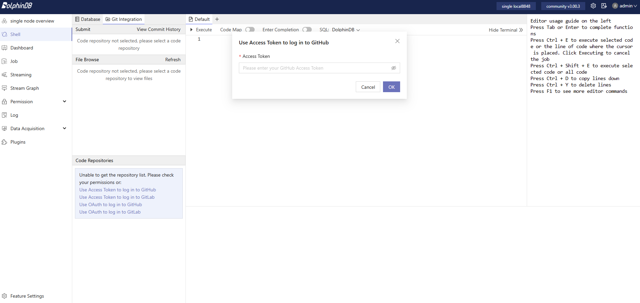
GitHub Access Token
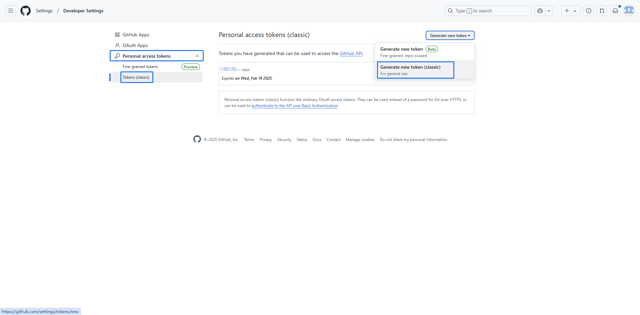
Create a GitHub Access Token (Managing your personal access tokens - GitHub Docs). Navigate to https://github.com/settings/tokens to connect your GitHub account and create a GitHub Access Token that can operate on Repo.
Enter the Access Token in the DolphinDB Web Interface and click OK to complete the process.
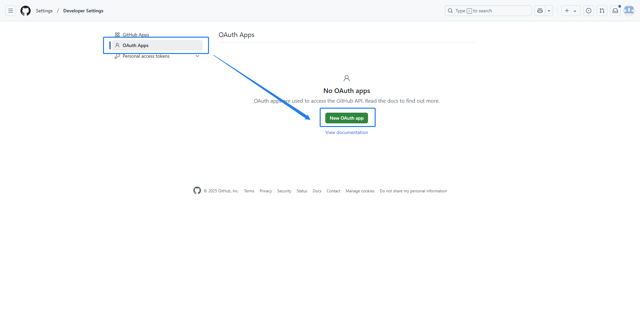
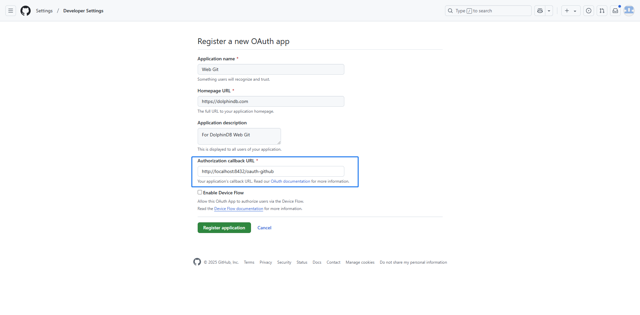
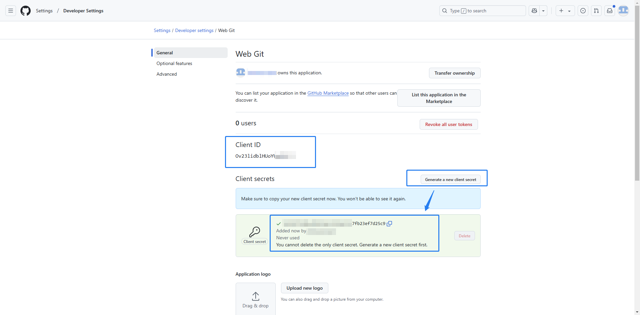
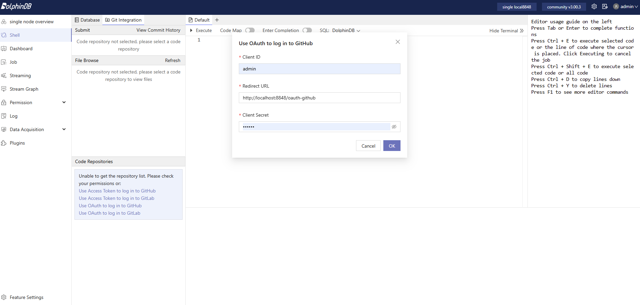
GitHub OAuth
Create an OAuth Application in GitHub (Creating an OAuth app - GitHub Docs), and obtain the Client ID and Client Secret.
Set the Redirect URL to the DolphinDB Web deployment address with the /oauth-github path (e.g., https://127.0.0.1:8848/oauth-github).
In the Web Interface, enter the Client ID and Client Secret, then click OK. The page will be redirected to the GitHub authorization page for authorization. Make sure that the DolphinDB server has the httpClient plugin installed and loaded to support SSO login to GitHub.
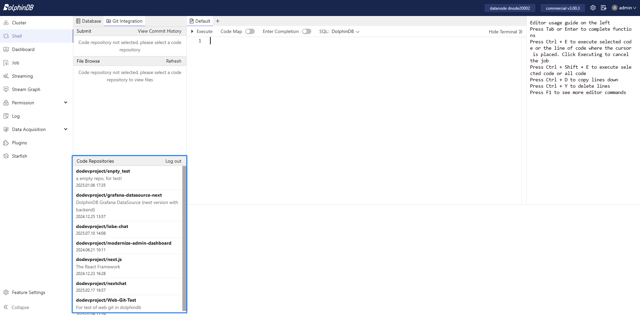
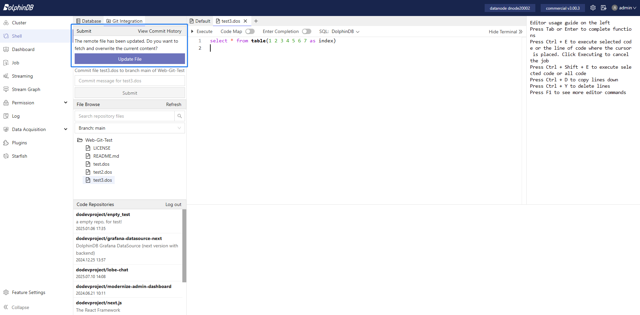
3.2 Browsing and Opening Files in Repositories
After connecting your Git account, you can view all the code repositories accessible to your account in the Code Repositories module.
After selecting a repository, in the File Browse module, you can view the repository's file tree structure and quickly search for files using the search box.
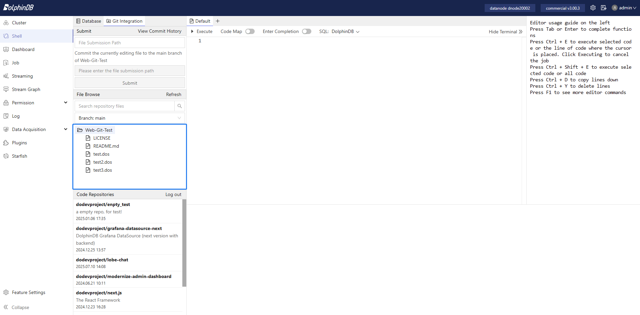
Clicking on a file name will open the file in a new tab, allowing you to use all the features of the Shell module.
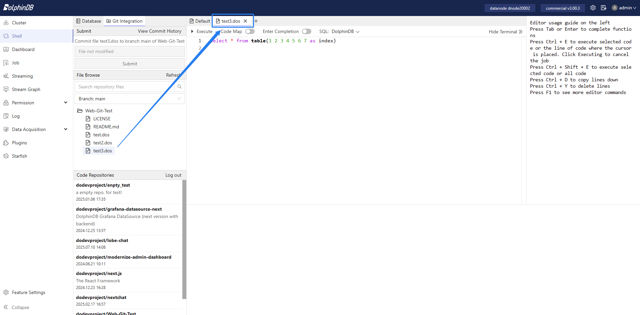
3.3 Modifying and Committing Files
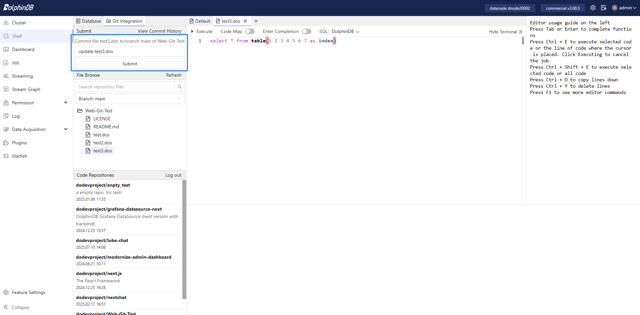
After modifying an existing file, you can fill out the commit message in the Submit module and commit the changes to the remote Git repository. Currently, we support single-file commits.
To create a new file, open a new tab and write the code. In the Submit module, select the target repository and branch, and fill in the file path (for example, new_file.dos to submit to the root directory, or src/new_file.dos to submit to the src directory).

After filling in the file path and commit message, a new file can be created in the repository. At the same time, a new tab will be created to display the committed file, which is now tracked by Git. You can safely close the previous tab that is not tracked by Git.
3.4 Viewing File History
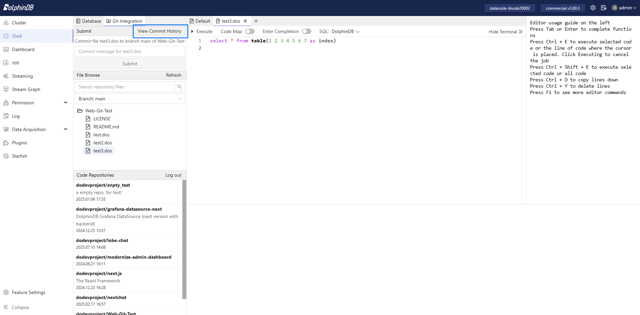
In the Submit module, click the View Commit History tab to see the commit history of the file.
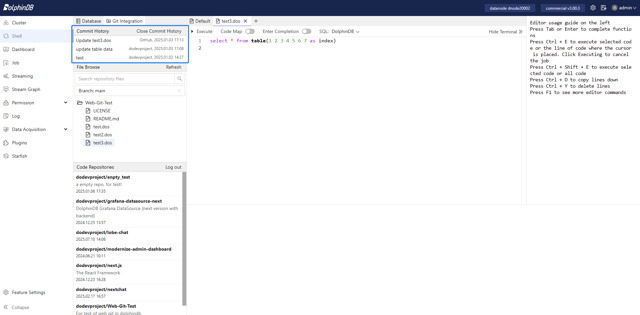
Clicking on a specific record will open the file content from that commit in a new read-only tab.

The tab name shows the commit hash value. To edit a committed version, copy the code to an editable tab.
3.5 Synchronizing Updates
For files that are being edited and are tracked by Git, you can pull the latest updates from the remote repository at any time, which will overwrite the local version.
Note: Pulling updates will overwrite local changes, so ensure that any content you want to keep is backed up.
4. Conclusion
This tutorial primarily introduces the improvements in the Shell module of Web Interface. The introduction of the multi-tab and Git integration features aims to address the challenges of code management and enhance user experience. The multi-tab feature allows users to manage multiple scripts like they would in a browser, improving code organization and making it easier to switch between them. Git integration feature enables version control, collaborative editing, and code synchronization, where users can connect their Git accounts in various ways, browse and modify repository files, view file history, and sync updates from remote repositories. These improvements will significantly enhance the efficiency and convenience of Shell in the Web Interface.