Best Practices for Using HAProxy in DolphinDB
This tutorial presents the best practices for using HAProxy in DolphinDB and offers a solution for high-availability clusters in handling high concurrency and large traffic in production environments.
HAProxy Overview
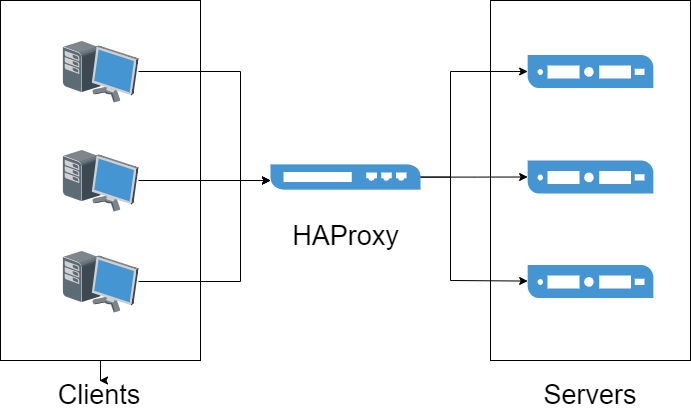
HAProxy is an open-source software developed in C language, offering high availability, load balancing, and proxying for TCP and HTTP-based applications.
This tutorial uses HAProxy version 2.6 and we recommend deploying a stable version for load rebalancing.
Configuration
Hardware Requirements:
| Hardware Resource | Configuration |
|---|---|
| Host | HostName |
| IP | xxx.xxx.xxx.122 |
| Operating System | Linux (kernel version 3.10 or higher) |
| Memory | 64 GB |
| CPU | x86_64 (12 CPU processors) |
Software Requirements:
| Software Resource | Version |
|---|---|
| DolphinDB Server | 2.00.8 |
| HAProxy | 2.6.2 |
| Docker | 3.0 or higher |
For more instructions on the installation, see HAProxy documentation.
Deployment
Before deploying HAProxy, you can set up a high-availability cluster with multiple data nodes. See High availability for DolphinDB.
Installation
Host Environment
Before installing HAProxy, make sure you have installed the epel-release, gcc, and systemd-devel dependencies. Execute the following command to install:
yum -y install epel-release gcc systemd-develDownload and extract the package of the HAProxy 2.6.2 source code:
wget https://www.haproxy.org/download/2.6/src/haproxy-2.6.2.tar.gz && tar zxf haproxy-2.6.2.tar.gzCompile the application from the source code:
cd haproxy-2.6.2
make clean
make -j 8 TARGET=linux-glibc USE_THREAD=1
make PREFIX=${/app/haproxy} SBINDIR=${/app/haproxy/bin} install  # Replace `${/app/haproxy}` and `${/app/haproxy/bin}` with your custom directories.
Configure the profile:
echo 'export PATH=/app/haproxy/bin:$PATH' >> /etc/profile
. /etc/profile
Verify the installation:
which haproxyDocker Environment
Execute the following command to pull the HAProxy Docker image (we use the haproxytech/haproxy-alpine:2.6.2 version):
docker pull haproxy:2.6.2-alpineCluster Monitoring Configuration
Create an haproxy.cfg file on the host and set the following configurations:
global                                         # Global configuration.
    log         127.0.0.1 local2               # Global syslog servers (up to two).
    maxconn     4000
    user haproxy
    group haproxy

defaults
    mode                    tcp                # The TCP mode.
    log                     global             # Enable per-instance logging of events and traffic.
    option                  tcplog             # Enable advanced logging of TCP connections.
    option                  dontlognull        # Disable logging of null connections
    option http-server-close
    option forwardfor       except 127.0.0.0/8 #
    option                  redispatch         # Enable session redistribution in case of connection failure
    retries                 3                  # The number of retries to perform on a server after a connection failure
    timeout http-request    10s
    timeout queue           1m                 # The maximum time to wait in the queue for a connection slot to be free
    timeout connect         10s                # The maximum time to wait for a connection attempt to a backend server to succeed. It should be set to a shorter time if the server is located on the same LAN as HAProxy.
    timeout client          1h                 # The maximum inactivity time on the client side.
    timeout server          1h                 # The maximum inactivity time on the server side.
    timeout http-keep-alive 10s                # The maximum allowed time to wait for a new HTTP request to appear.
    timeout check           10s
    maxconn                 3000               # The maximum connections to the server.

frontend    ddb_fronted
    bind        *:8080 # listening port
    mode        tcp
    log         global
    default_backend ddb_backend

backend ddb_backend
    balance roundrobin                         # The algorithm used to select a server when doing load balancing. Each server is used in turns, according to their weights.

    server node1 xxx.xxx.xxx.1:9302 check inter 5s rise 2 fall 3
    server node2 xxx.xxx.xxx.2:9302 check inter 5s rise 2 fall 3
    server node3 xxx.xxx.xxx.3:9302 check inter 5s rise 2 fall 3
    server node4 xxx.xxx.xxx.4:9302 check inter 5s rise 2 fall 3

listen stats
    mode    http
    bind    0.0.0.0:1080                       # The listening port
    stats   enable
    stats   hide-version
    stats uri /haproxyamdin                    # The statistics URI
    stats realm Haproxy                        # The authentication realm
    stats auth admin:admin                     # Enable statistics with authentication and grant access to an account
stats admin if TRUENote: The IP and ports specified for the backend servers can be customized according to your scenario. For further examples, refer to HAProxy Configuration Manual.
Startup
Run the following command on the host to start HAProxy. The command -f is followed by the configuration file location, the default value is /etc/haproxy/haproxy.cfg.
haproxy -f /haproxy/haproxy.cfgTo create a container in a Docker environment, execute the following command. Ensure that the monitoring port and front-end port are mapped to the host and that the haproxy.cfg file configured on the host is mapped to the container.
docker run -itd --name ddb_haproxy -p 8080:8080 -p 1080:1080 -v /haproxy/haproxy.cfg:/usr/local/etc/haproxy/haproxy.cfg --privileged=true haproxy:2.6.2-alpineAfter a successful startup, you can use DolphinDB client tools to connect to HAProxy. These tools include VS Code extension, GUI, and web interface. You can access the cluster by specifying the port as 8080.
Note: When a DolphinDB client tool connects to the listening proxy port, HAProxy will allocate connections to one of the nodes deployed in the back end for load balancing according to corresponding algorithm rules.
Operation and Maintenance
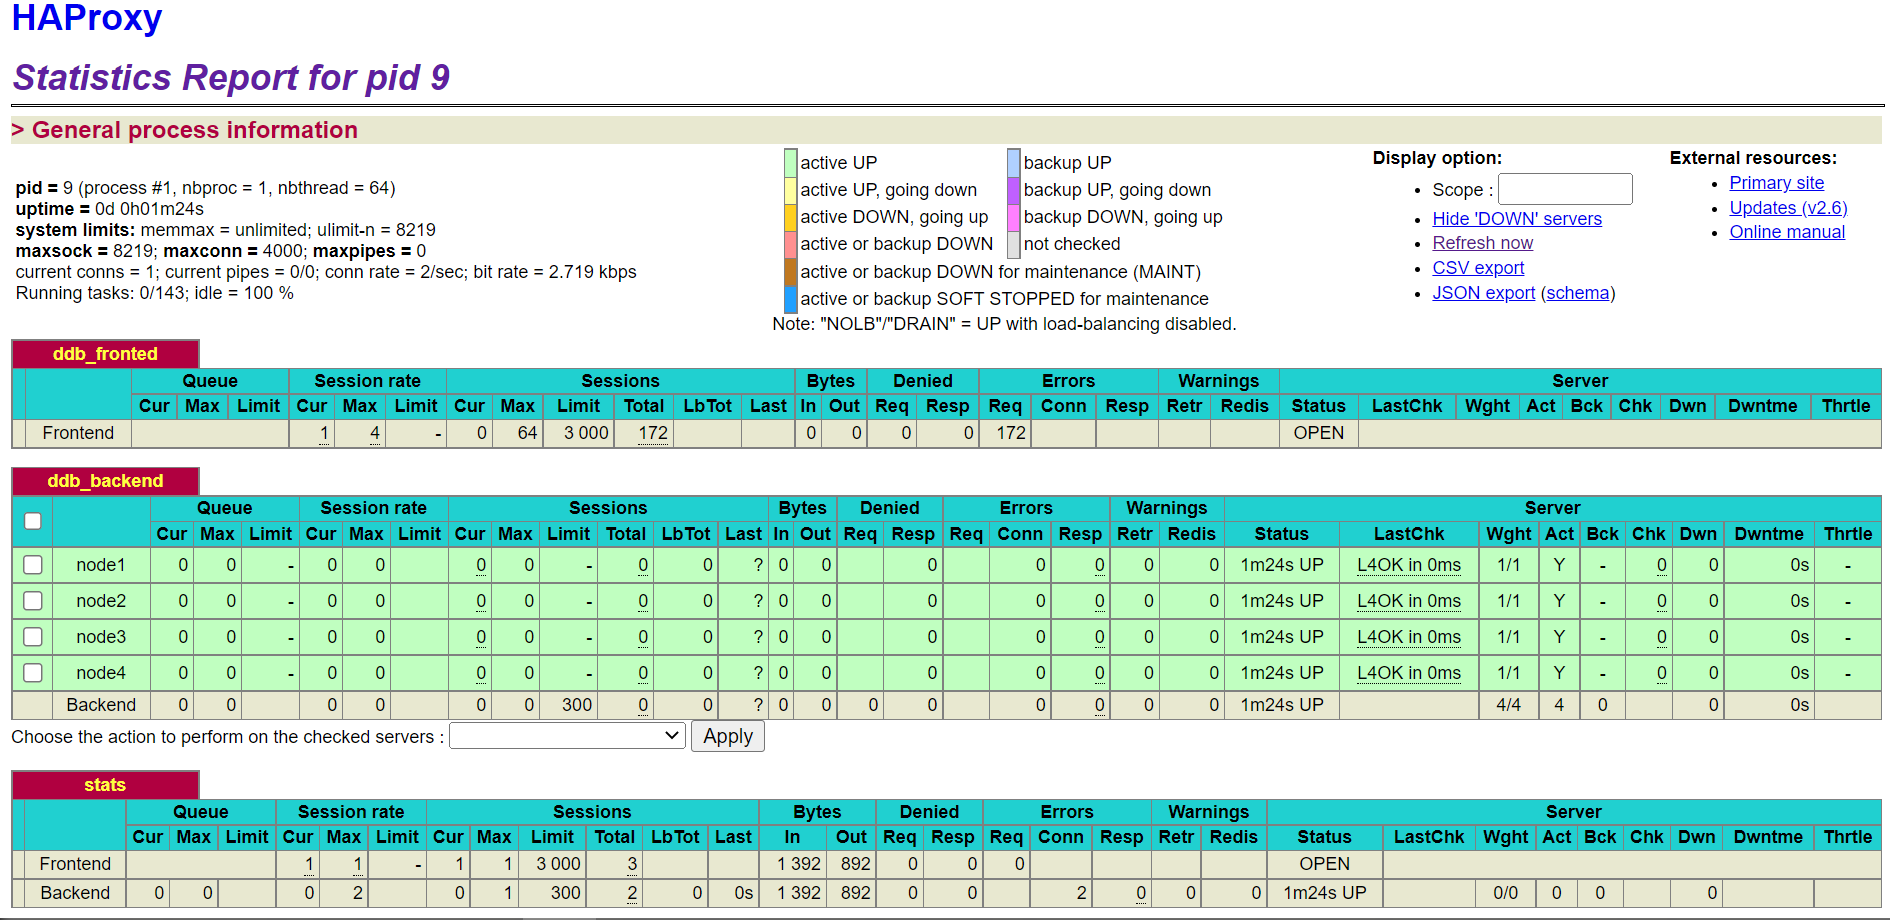
HAProxy Stats Page
To view the HAProxy Stats page, enter the host IP, listening port, and configured URI (e.g. xxx.xxx.xxx.122:1080/haproxyamdin) in a browser on any machine that can access the HAProxy host.
Restart or Terminate HAProxy
You need to terminate or restart HAProxy for the configuration changes to take effect.
Run the following command to find the PID of a running HAProxy process on host:
ps -ef | grep haproxyThen run the kill command to terminate the process:
kill -9 ${haproxy_pid}To restart HAProxy, you can invoke command haproxy -f again.
In Docker environment, you can use the following command to restart the service:
docker restart ddb_haproxyTo terminate and delete the container, you can run the following command:
docker stop ddb_haproxy && docker rm ddb_haproxy